Skillet Brownies
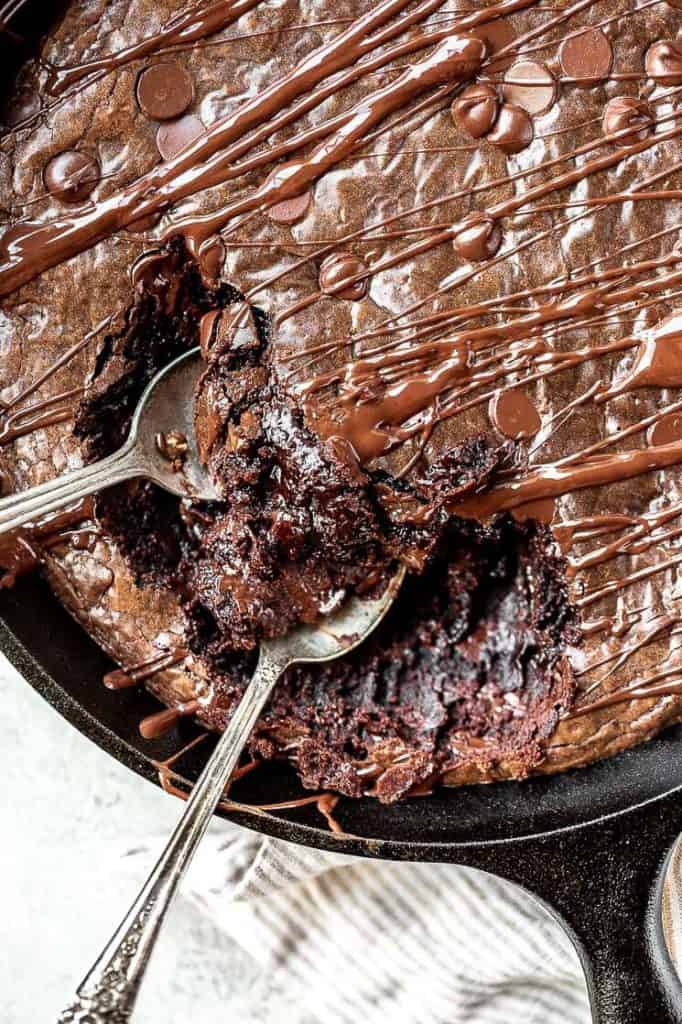
If you’re into super fudgy and ooey gooey brownies, you’re going to LOVE this recipe for gluten free skillet brownies. It has that perfect glossy, paper thin crust on top with a melty center and chewy edge. The texture is all due to a secret ingredient that makes this skillet brownie extra rich.
This post is sponsored by SunButter and all thoughts and opinions are my own. Thank you for supporting the brands that make Butternut Bakery possible!

How to make the BEST skillet brownies
It’s all in how you mix the batter! In order to achieve that perfect paper thin top and gooey center, it starts with the eggs and sugar.
For this recipe, you will need 1 cup brown sugar and 2 large eggs plus one egg yolk. The brown sugar helps add chewiness that would otherwise come from the gluten in regular all-purpose flour. The extra egg yolk serves the same purpose while also enhancing the richness of the batter.
If you would like to make this a refined sugar free recipe, subbing the brown sugar for coconut sugar will do the trick!
How to get a crinkle top on brownies
Start off by whisking together the sugar and eggs…and I mean REALLY whisk them. In the photo below, you can see how the mixture becomes pale, creamy, and fluffy with small air bubbles all throughout. This takes about 3-5 minutes of rigorous whisking…a small price to pay for amazing brownies.
This is what gives you that paper thin crust on top because we’re whipping air into the egg whites. As the brownies bake, those air bubbles help lift the sugar crystals near the surface, causing that shiny crackly top.
It also helps dissolve the sugar which creates a creamy and rich texture.
Speaking of texture, another important step is to gently fold in the dry ingredients – being all-purpose gluten free flour and salt.
After the eggs and sugar are whipped to the right consistency, mix in the melted chocolate, butter, cocoa powder, and the super secret ingredient. These have all been melted together on the stove top prior to this step.
Once that’s mixed in, ditch the whisk and switch to a rubber spatula. Dump in the flour and salt and gently fold it into the batter. This ensures most of those air bubbles (that you worked so hard for) stay in tact.
And since this brownie recipe is gluten free, you don’t have to worry about over mixing as much as you would a regular brownie recipe. Typically, you want to leave a few ribbons of flour in the batter to ensure you don’t over mix. Otherwise, you’ll over-work the gluten strands which leads to a tough brownie. But again, not really an issue here!
Last but not least, fold in that mound of chocolate chips. This only adds to that ooey gooey center so it’s an absolute MUST in this recipe! The more the merrier.
How to make dairy free and gluten free skillet brownies
I am all about making super simple substitutions when it comes to gluten free and dairy free baking. Not everyone has access to the many varieties of gluten free flours out there, nor do they want to store them in their kitchen. And with dairy free alternatives being more and more popular, it’s much easier to get your hands on common dairy free baking necessities.
For gluten free baking, my go-to is the standard all-purpose gluten free baking flour with xanthan gum mixed in. It works great every time and you just need one bag. Although, if you can’t find one with xanthan gum, simply mix 3/4 tsp of xanthan gum into the 3/4 cup of flour for this recipe. The ratio is 1 tsp xanthan gum to every 1 cup of flour.
For the dairy free portion, I use a plant based butter that works the EXACT same as regular butter. It melts the same, bakes the same, and tastes the exact same. What I love about this ingredient is that it’s becoming way more accessible compared to even just a year ago. I find mine at my local grocery store.
Also make sure to use dark chocolate as this contains little to no dairy. For the chocolate on top, melt together 1/2 cup of chocolate with 1 tsp coconut oil. It creates the perfect thin consistency for drizzling and acts almost exactly like a ganache. It’s an optional addition but highly recommended!
The SECRET ingredient to extra fudgy skillet brownies
Drum roll please….the secret to getting EXTRA fudgy and SUPER gooey skillet brownies is with…..SunButter!
Yep, drippy natural SunButter creates the PERFECT texture in these cast iron skillet brownies. It’s kind of like magic.
The reason why SunButter works so great here is because of its flavor. It’s not as strong as a nut butter so it goes nearly undetected among all the chocolate. You get all the benefit of the texture without the flavor, so no one will ever know why these brownies taste so dang good. We’ll just keep that between us.
Of course, I also love using SunButter where the flavor can shine! Like in my SunButter Chocolate Chip Cookie Dough Fudge and Gluten Free SunButter Millionaire Shortbread Bars. That’s what I love about it, it’s such a flexible ingredient that can be used for both flavor and/or texture.
SunButter caries a variety of sunflower seed butters, but natural SunButter is the only way to go for this recipe. It’s a bit thinner and has a higher oil content to create that extra gooey center.
To be honest, it’s hard to explain just how good it makes this brownie recipe. After one bite, you’ll know exactly what I mean. You know something is extra special about this brownie, you just can’t quite put your finger on it. You’ll just have to try and see for yourself!


How to serve skillet brownies and cast iron alternatives
I devoured this skillet brownie. I just could not stop eating it. With a spoon, with two spoons, with my hands, it was not a pretty sight.
That being said, there are a few different ways you can eat this skillet brownie. If you like an ooey gooey brownie that hardly holds together, just dig a spoon right in when it’s still warm.
If you try to cut a slice when it’s fresh from the oven, it won’t hold its shape which is why the spoon route is the immediate way to go.
But, if you prefer a chunk or a slice, let it cool completely. The brownies will still be ooey gooey but more on the fudgy side. By this point you’ll be able to slice into it and pick up a piece for yourself.
Another pro to this recipe is that it STAYS fudgy for a few days. I accidentally left it out all night uncovered when I was testing it, only to find that super fudgy texture still intact the next morning. It honestly looked like I just baked it!
To store it, wrap the skillet in plastic wrap and leave out at room temperature for up to 3 days. For longer, store in the fridge for up to 10 days.
Cast iron skillet alternatives
Now if you’re thinking, I really want to make these but I don’t have a cast iron skillet. Don’t worry! These brownies can also be baked in a regular baking pan.
Bake in an 8×8 baking pan but increase the time by 3-5 minutes. The brownies will be a bit thicker in the baking pan so you want to ensure that they bake all the way through.
The edges might not turn out as chewy as they would in the cast iron, but the brownies will still be delicious! This is just due to the fact that cast irons heat up and cool down really fast, so the edges of the brownie are blasted which heat much faster.
If you have any other questions about this recipe, don’t hesitate to leave a comment below!

For more skillet desserts, check out my:
- Vegan and Gluten Free Apple Crisp
- Nutella Stuffed Deep Dish Cookie
- Gluten Free Oatmeal Chocolate Chip Skillet Cookie
Make sure to tag me @butternutbakery on Instagram or comment below if you make these Gluten Free Skillet Brownies. To pin this recipe and save it for later, you can use the button on the recipe card, the buttons above or below this post, or on any of the photos above. Happy baking!
Print
Skillet Brownies (Gluten Free and Dairy Free)
- Total Time: 40 minutes
- Yield: 16 brownies
Description
This is seriously the FUDGIEST and GOOIEST recipe for skillet brownies. Not only are they insanely delicious, but they’re also gluten free, dairy free, and made with a secret ingredient to get that perfect texture.
Ingredients
- 3/4 cup vegan butter (or regular unsalted butter)
- 4 oz dark chocolate, chopped
- 1/3 cup dutch processed cocoa powder
- 1/3 cup natural SunButter
- 1 tsp vanilla extract
- 2 large eggs + 1 egg yolk
- 1 cup light brown sugar, packed (or coconut sugar)
- 3/4 cup gluten free all-purpose flour (with xanthan gum)*
- 1/4 tsp salt
- 1 1/2 cups dark chocolate chips (divided) + 1 handful for sprinkling
- 1 tsp coconut oil
Instructions
- Preheat the oven to 350F and spray your cast iron with some nonstick spray. I used a 10.25″ cast iron skillet.
- In a saucepan, add the butter, 4 oz chocolate, cocoa powder, and natural SunButter. Melt over medium heat until fully combined. Take it off the heat and mix in the vanilla. Allow it to cool for about 15 minutes.
- In a large bowl, whisk together the eggs and sugar. This takes some effort, but really whip the two together until it becomes pale and fluffy (see picture about). This takes 3-5 minutes of whisking.
- When the chocolate mixture is cooled enough to where it’s just warm to the touch (not hot), slowly pour it into the egg mixture and continue to whisk.
- Once that’s combined, switch to a rubber spatula and dump in the flour and salt. Fold them into the batter and then fold in 1 cup chocolate chips.
- Pour the batter into the cast iron and spread even. Sprinkle a handful of chocolate chips on top and bake for 20-25 minutes.
- Once baked, melt together the remaining 1/2 cup of chocolate and 1 tsp coconut oil. Microwave in 30 second intervals until smooth and glossy. Drizzle it on top of the warm skillet brownies.
- You can either dig right in with a spoon while the brownies are still warm, or let them cool completely and cut into slices. Either way, it’s super fudgy and delicious!
- Prep Time: 20 minutes
- Cook Time: 20 minutes
Join Our Community

Meet Jenna
I’m the creator, baker, and photographer behind Butternut Bakery. Here I share desserts for every diet because I believe everyone should have a chance to indulge!


These were amazing! I’m an avid baker and love baking breads and cookies but I’ve always had terrible luck making brownies that turn out good and finally found a recipe that’s super easy and turned out the best brownie I’ve ever made so thank you! My daughter is a big fan of chocolate and she found this recipe and said we must try making it since it looked so good so a photo does speak volumes. I was short 1/2 cup of chocolate chips and had regular all purpose flour so used that and omitted the sun butter since we didn’t have any and used butter instead of coconut oil. It turned out great with a crackly shiny top and very gooey brownie that was still good after it cooled. I really loved that there’s no baking soda or powder in this recipe because I can’t stand the taste of it. This really was amazing but next time I might try using less sugar just to lower the sugar content. Everyone in my family loved it. Now I have confidence to make this for a school birthday treat!
How would the recipe be modified if i didnt want to do gluten free? Would i remove 1 egg yolk and some of the brown sugar?
I love this recipe! I did it with Tahini and it turned out amazing! What type of vegan butter do you use? I’m wanting to make it for dairy free friends.
Can I use applesauce as an egg replacement?
Is it alright to use a normal brownie pan because I don’t have a skillet ???
Hi! It looks delish! But how can I replace the sunbutter if I can’t find it where I live? 🙂
When do you add the vanilla and coconut oil?
OMG these look amazing! I am avoiding gluten & dairy right now, so I need these!!
I can just imagine putting a big scoop of vanilla on top and handing everyone a spoon! My family would go crazy for this. We’re big fans of Sunbutter too! Thanks for another fabulous recipe.