Salted Peanut Butter Christmas Trees
These no bake peanut butter bars are perfect for the Holidays! Made with crispy rice cereal, pretzels, oats, chocolate, and peanut butter, these bars are a delicious salty and sweet treat. They’re also fun and easy to decorate with your little ones. I decorate cookies with my niece and nephew every year, but this year we’ll be decorating these Christmas trees. It’s faster, easier, and we get to jump straight into their favorite part – sprinkles!
The secret to chewy no bake peanut butter bars
For how simple this recipe is, these bars have the BEST texture and flavor. They’re crispy, gooey, chewy, and peanut buttery. They even have a slight caramel flavor, making these extra indulgent.
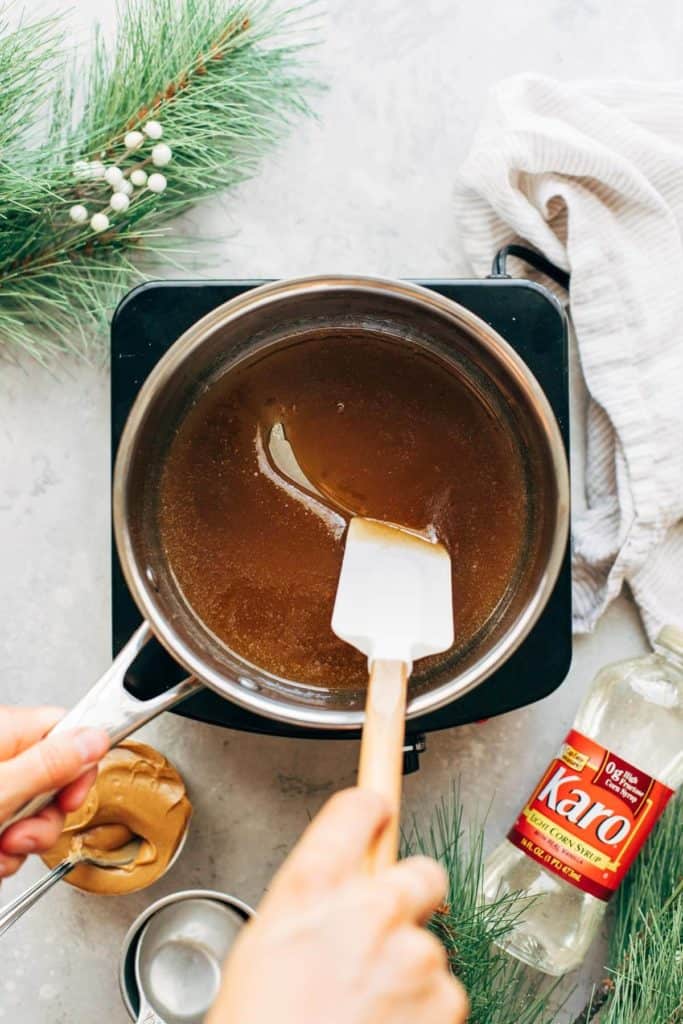
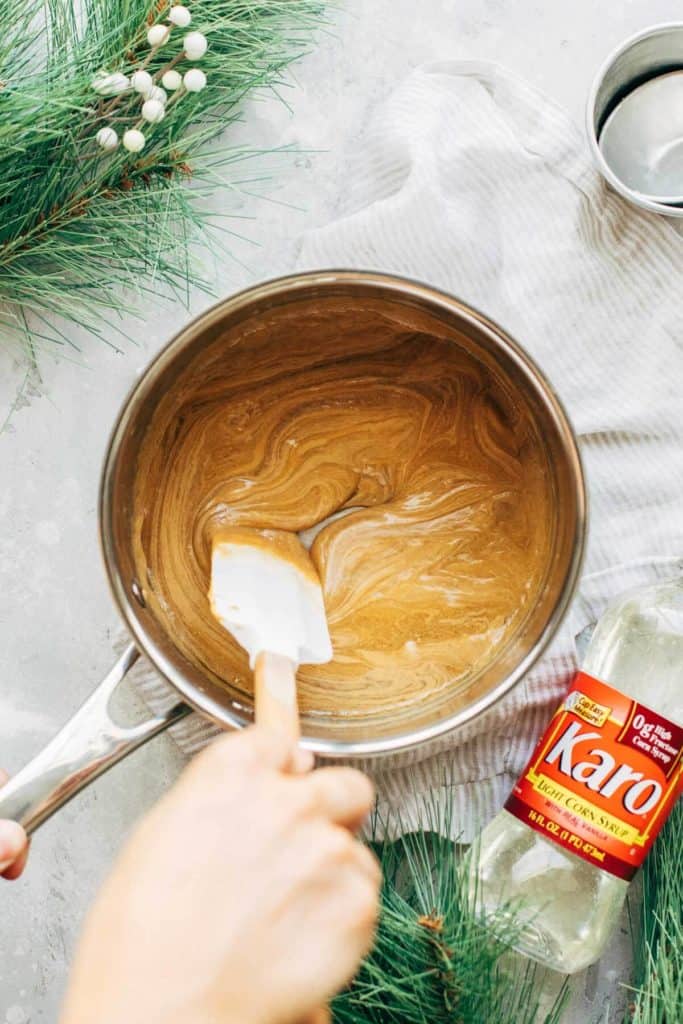
The key ingredient to achieving that amazing texture is all in the base. The recipe starts out with two very important ingredients: Karo Light Corn Syrup and brown sugar. The two melt together in order to create a really quick caramel that stays soft and tender. The brown sugar creates that chewiness, but the Karo Light Corn Syrup is what keeps these bars soft and gooey.
It’s the perfect base to mix with the creamy and salty peanut butter. The sweetness of the brown sugar and Karo Corn Syrup balances out the rest of the ingredients in these bars, making a crowd-pleasing salty and sweet combo.
Benefits of corn syrup
The reason why Karo Corn Syrup makes these bars so delicious is that it adds moisture and sweetness without overpowering the flavors. It’s what helps hold these bars together, while also preventing them from becoming too firm or dry.
It does so by preventing the brown sugar from crystalizing. Once the sugar is dissolved, the corn syrup stops the sugar from becoming grainy when cooled. In the end you’re left with creamy no bake peanut butter bars that will last for days…if they aren’t devoured by then!
Tips for perfect Christmas tree bars
This is a very simple recipe to make, but here are a few tips to ensure they turn out perfect:
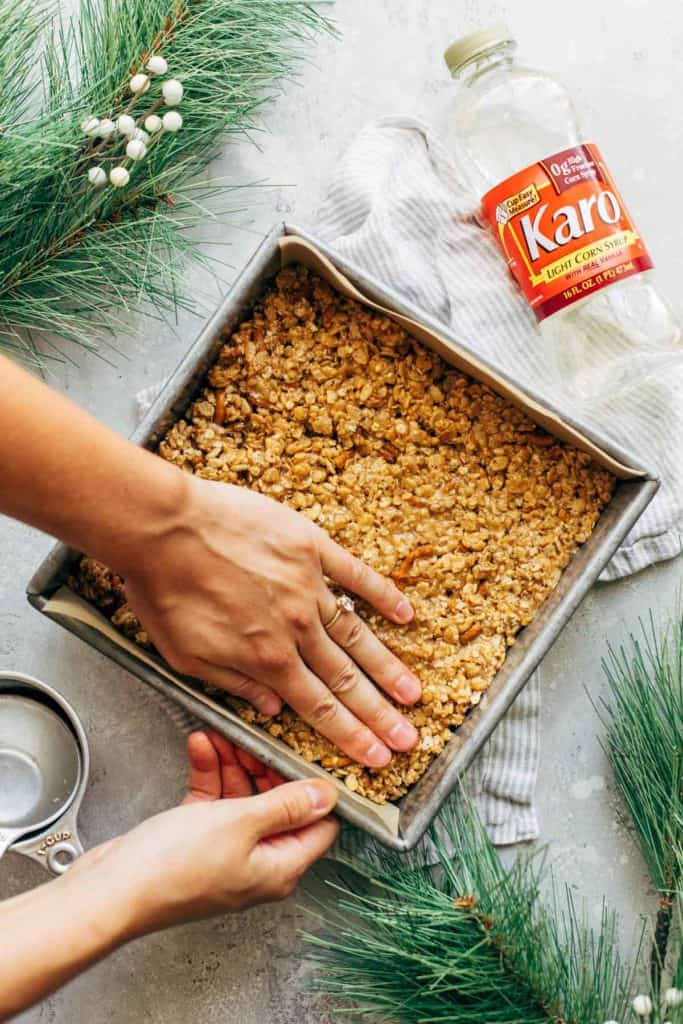
- Prep the mix ins – The dry ingredients in this recipe consist of crispy rice cereal, oats, and pretzels. It’s important that the pretzels are finely crushed to closely resemble the size of the cereal and oats. Otherwise, the bars will become too clunky and loose, making it more difficult to cut and hold into triangles. The easiest way to crush them is to toss some pretzels into a ziplock bag and smash them with the bottom of your peanut butter jar.
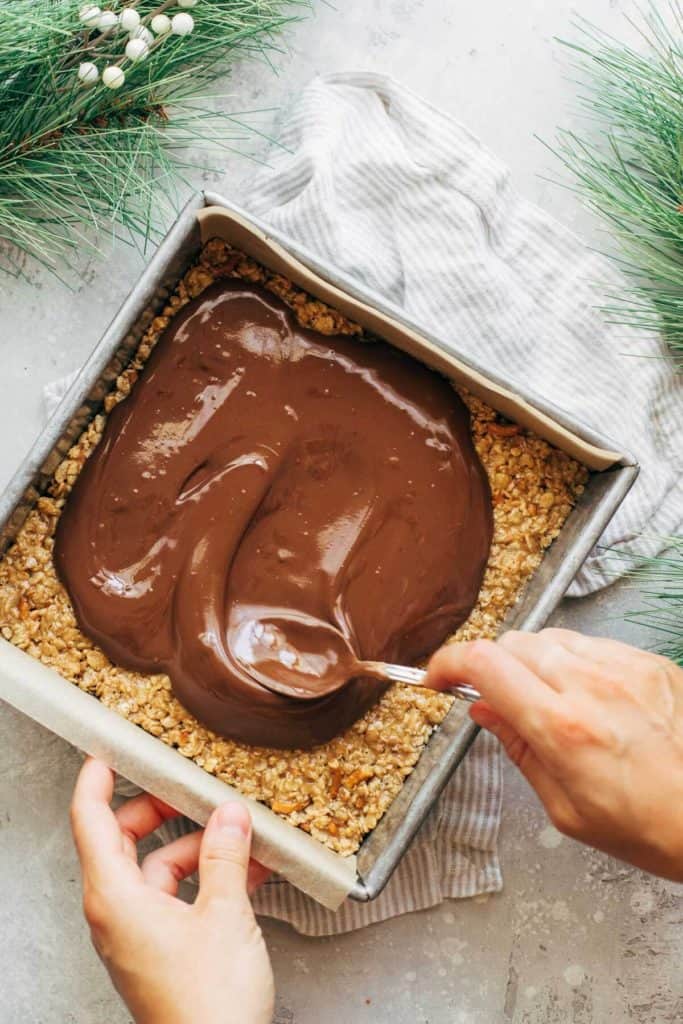
- Pressing the pan – Really press and pack the peanut butter bars into your baking pan. The mixture isn’t sticky, so use your hands to press it flat and into each corner. This will ensure each triangle comes out perfectly sliced and will hold together.
- Melting the chocolate – The top layer consist of peanut butter and chocolate chips. When melting, only heat for 30-45 seconds. If the mixture still looks a little lumpy after 45 seconds, keep mixing and the lumps should smooth out. If they don’t, heat for 15 seconds at a time until you’re able to mix out those lumps with a spoon.
- Spreading the chocolate – To add the finishing chocolate layer, spread it even and then give the pan a gentle shake. This will flatten out any ridges, giving you a smooth surface to decorate.
How to slice these bars into triangles
It’s important to allow the bars to chill before slicing. You can do so by placing them into the refrigerator for 30 minutes to an hour. It’s ready when the surface is firm to the touch.
To speed up this process, freeze the bars for 30 minutes. I find that freezing is very effective and provides the cleanest cuts, but it does require a bit more effort as the bars will be very firm.
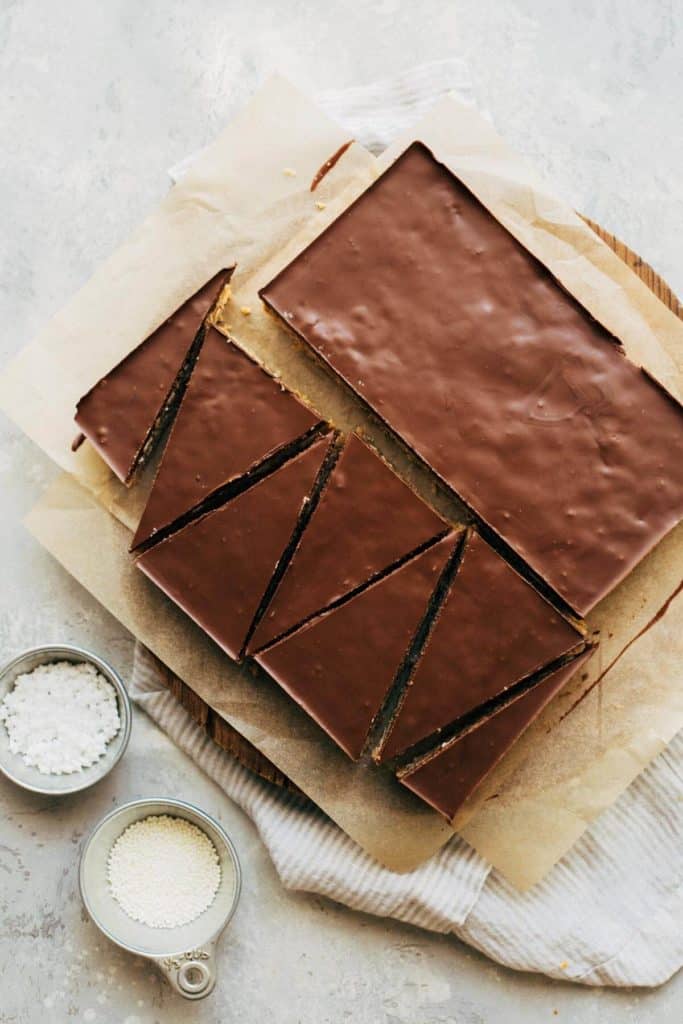
Either way, you want to make sure you use a large knife that nearly spans the width of the baking pan. You don’t want to drag a knife across the bars, otherwise you’ll end up with messy slices.
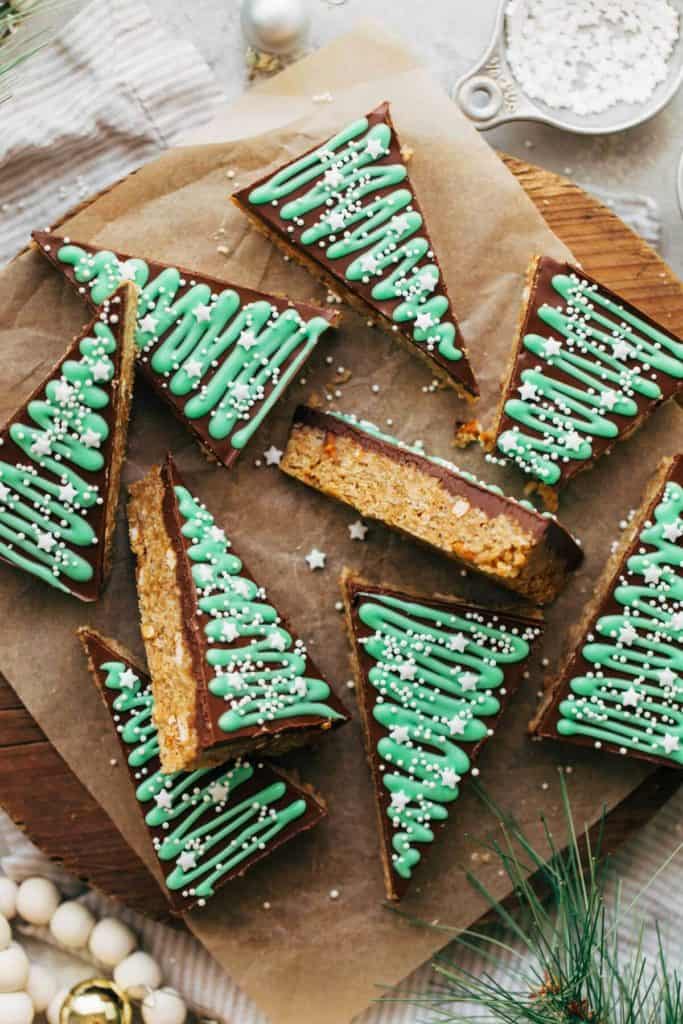
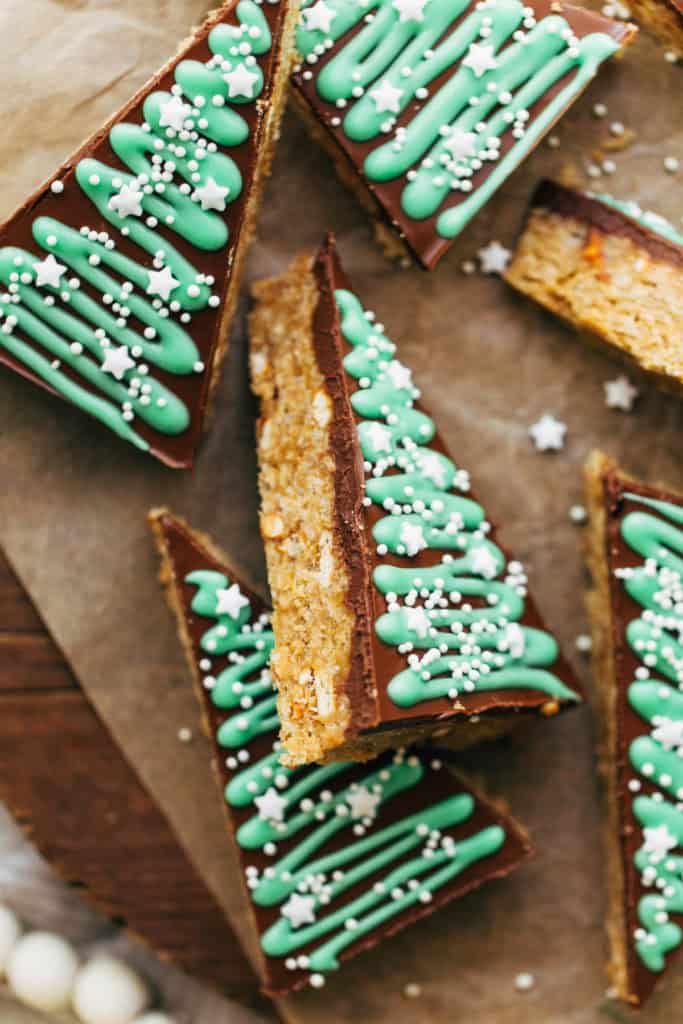
Lift the bars out of the pan using the parchment paper overhangs. Place the bars onto a cutting board and slice right down the middle. With each half, slice into 5 triangles. In the end, you should have 10 triangles with 4 odd corners. Those are for taste testing!
For the best results, place the triangles onto a plate and transfer to the refrigerator while you make the icing. It’s much easier to decorate these bars when you’re cool and firm.
Decorating your mini Christmas trees
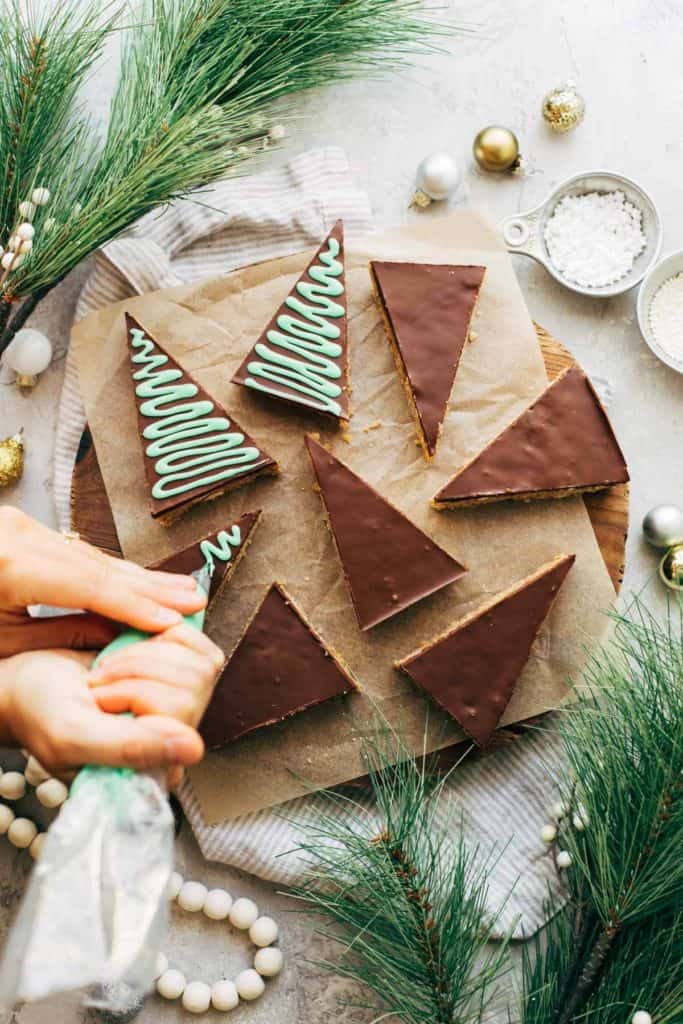
The pictures shown here are a depiction of how I like to decorate my Christmas desserts, clean and simple. But this is definitely not the case with my niece and nephew! The more colors and sprinkles, the better.
If you’re making these bars as a gift, you can opt for any decorations you prefer. But if you’re decorating as an activity (like I’ll be doing this year), use my icing recipe as a base and make as many colors as you like.
Make the icing recipe in separate bowls and add different colors to each. For best results, I recommend using gel food coloring. It gives you the biggest payoff and the most vibrant colors.
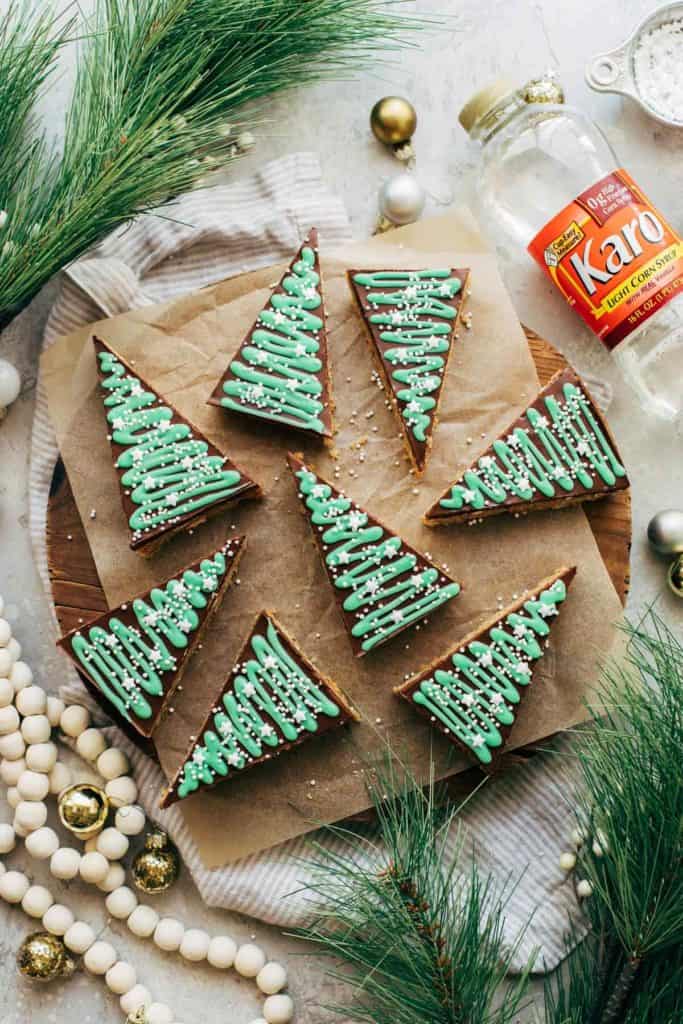
Add the icing to individual piping bags or ziplock bags and snip off a very tiny corner. Pipe in a zigzag motion for a classic Christmas tree look, or go in any direction you like. Knowing my niece and nephew, these will end up looking like Jackson Pollock trees by the end.
Same goes for the sprinkles. I used simple white nonpareils and stars here, but you can go for rainbow, red and green, gold…the possibilities are endless. If using nonpareils (the tiny round sprinkles), make sure to place a rimmed sheet or plate underneath the bars while you sprinkle them on. Those little round sprinkles tend to roll everywhere.
How to package your Christmas trees
If you’re sharing these as a gift, I recommend placing them in a round tin arranged like pie slices. Since the top layer is a mixture of peanut butter and chocolate, it’s soft at room temperature. Placing them flat in a tin will keep them soft but will not damaged the tops or the decorations.
The best time to serve your no bake bars
You want these bars to be cold when decorating, but room temperature when serving. By the time the decorations are complete, they should be at the perfect temperature! They’ll be soft, chewy, and melt in your mouth.
You can also serve these chilled if you prefer a really chewy bar. The Karo Corn Syrup will prevent the bars from becoming too hard, so it’s up to your preference.
How to store the bars
Lay the bars flat inside a container and store either at room temperature or in the refrigerator. With either option, they’ll keep for about a week.
For more festive Holiday recipes, check out my:
- Christmas Sugar Cookie Bars
- Gingerbread Tiramisu
- Chocolate Peppermint Bundt Cake
- Soft Molasses Cookies
- Chewy M&M Brownies
Make sure to tag me @butternutbakery on Instagram and leave a review below if you make these No Bake Peanut Butter Christmas Trees. To pin this recipe and save it for later, you can use the button on the recipe card, the buttons above or below this post, or on any of the photos above. Happy baking!
Watch how to make these no bake peanut butter bars here:
Salted Peanut Butter Christmas Trees
- Total Time: 1 hour
- Yield: 10 bars
Description
These no bake peanut butter bars sliced into Christmas trees! They’re salted, chewy, crunchy, creamy, and have a hint of caramel flavor.
Ingredients
Peanut Butter Bars
- 1/2 cup (100g) light brown sugar, packed
- 1/2 cup (170g) Karo Light Corn Syrup
- 3/4 cup (190g) creamy peanut butter
- 1/2 cup (60g) crushed pretzels *see notes for GF option
- 1 cup (100g) quick oats
- 2 cups (55g) crispy rice cereal
Chocolate Topping
- 3/4 cup (130g) semisweet chocolate chips (reg or vegan)
- 1/2 cup (125g) creamy peanut butter
Decoration
- 1 cup (120g) powdered sugar
- 1 1/2 tbsp milk (reg or plant-based)
- 1–2 drops green gel food coloring
- Sprinkles of choice
Instructions
Peanut Butter Bars
- In a large bowl, combine the pretzels, oats, and cereal.
- In a saucepan over medium heat, mix together the corn syrup and brown sugar. Continue to mix until the mixture starts to bubble. Allow it to bubble for about 30 seconds, then remove from heat and add the peanut butter.
- Pour into the bowl of cereal and stir to coat.
- Press into an 8×8 square baking dish that has been greased and lined with parchment paper. Allow the paper to hang over the edges for easy removal. Make sure to press it firm and into all of the corners.
Chocolate Topping
- Add the chocolate chips and peanut butter to a heat-safe bowl and microwave for 30 seconds. Stir and microwave for another 15-30 seconds until smooth.
- Pour over the peanut butter layer and spread it even. Give the pan a gentle shake and tap to even out the topping.
- Place into the refrigerator for 30 minutes to 1 hour to set. To speed this up, freeze for 20 to 30 minutes (just know they’ll need a bit more elbow grease to slice when frozen).
Assemble
- Once set, remove the bars from the pan. You may have to run a knife along the two sides opposite of the parchment paper before lifting them out.
- Make a cut right down the middle, and then slice each half into 5 triangles (see picture in post for reference).
- To make the icing, mix together the powdered sugar and milk. Once it resembles the texture and consistency of glue, add the green food coloring. If it’s still too thick, add 1 tsp of milk at a time until you reach the right consistency.
- Add to a piping bag fitted with a small round tip (or to a ziplock bag with a small corner snipped off). Pipe zig zag lines onto the trees and top with your choice of sprinkles. Enjoy!
Notes
GLUTEN FREE – To make gluten free, use gluten free pretzels, gluten free oats, and gluten free brown puffed rice cereal or crushed rice chex.
- Prep Time: 20 minutes
Join Our Community


Meet Jenna
I’m the creator, baker, and photographer behind Butternut Bakery. Here I share desserts for every diet because I believe everyone should have a chance to indulge!
Hello Jenna,
I would really like to try this recipe. It looks really good. Just my daughter ist extremely allergic to peanuts. Can you suggest an alternative for this ingredient?
Thank you for your reply in advance! Have a lovely christmas season.
Best regards
Loraine
Love Love Love this recipe! My only gripe is how hard it is to cut into these. Is the be all end all that I need to use a ridiculously sharp knife? Should I warm up the knife before cutting into it?
An easy way to cut these with no waste is to put them in a round pan…I use a pie pan…then cut into trees…great recipe! I crumble my parchment paper to fit into the pan and just pull them out and cut.
Do you have to use corn syrup or is there a substitute? I can’t seem to find it in supermarkets in Ireland
I need to make these GF but my store doesn’t carry gluten-free quick oats, can I make these with old fashioned and just pulse in food processor to break up?
We only have regular oats will using these over quick oats make a big difference?
These are so fun.
Is there a trick to getting those clean lines when cutting.
Does the frosting get hard that you could stack the for gift giving?
I’m making these. Thank you!
Can you use chunky peanut butter for this recipe?
These look great! I assume they can be kept at room temperature in an airtight container? I’m hoping to make them before Christmas (P.S. Saw your post on IG).
So good! Made it with my almost 9-year old and was a huge hit. Thank you!