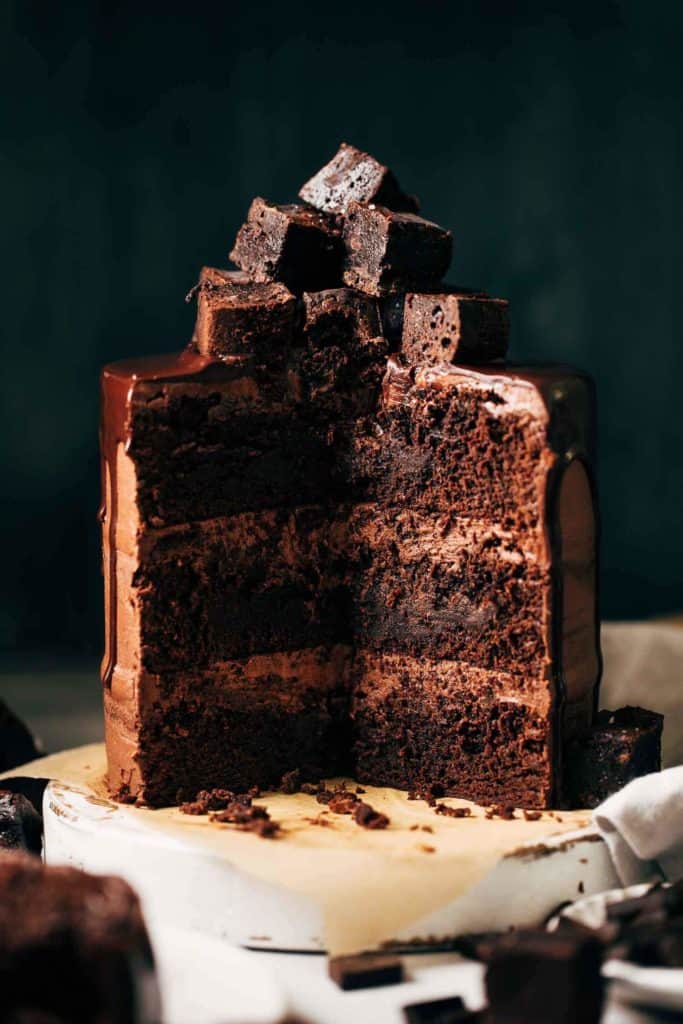
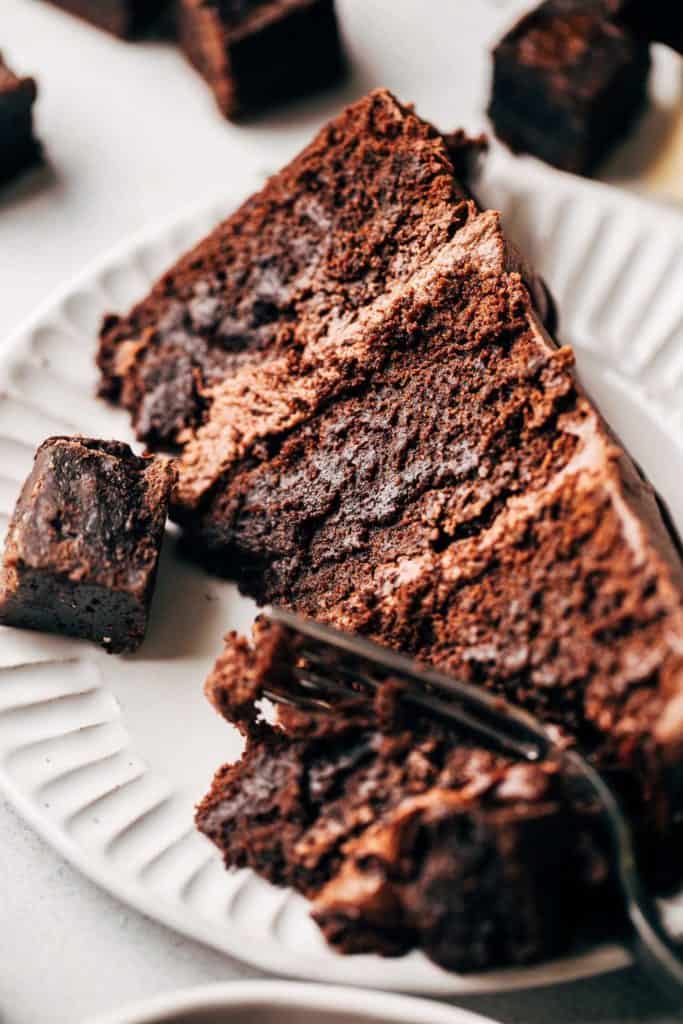
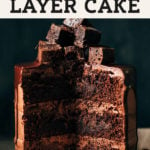
Fudgy Brownie Cake
This is the ULTIMATE cake recipe for any chocolate lover! Layers of brownie cake are stacked with creamy chocolate frosting and topped with silky chocolate ganache and a pile of fudgy brownie bites. The cake is rich and dense like a brownie, but subtly puffed and fluffy – just enough to claim it as a cake. Trust me, it is unlike any other chocolate cake recipe you’ve ever had!
What is brownie cake?
Ok I know what you’re thinking. Is it a brownie…or cake? It honestly strikes the perfect balance between both. It has all the delicious qualities of a brownie – that being rich, fudgy, dense, and chocolatey – alongside the subtle texture of an extra moist and fluffy cake.
But because it has both qualities, that does not make it a cakey brownie. I find cakey brownies tend to be a bit dry, and this cake is anything but. It’s so moist, thanks to the extra butter and whopping 7 eggs that are inside the batter. The extra fat content from both ingredients provides a super rich cake, transforming it from a moist and fluffy chocolate cake to a dense and rich brownie cake.

Tips for making brownie cake
I’d assume many of you have never made a brownie cake before as it’s a fairly uncommon dessert, which is why I’m sharing my top tips to ensure yours turns out perfectly rich and decadent:
- Properly measure the dry ingredients – I say this in every post, and for good reason. It’s the number one reason why most recipes fail. If there’s too much flour, the cake will turn out dry and crumbly. If you can, measure the flour and cocoa powder with a food scale. Otherwise, to ensure you use the exact amount needed, gently spoon the flour into your measuring cup and level if off with a flat edge. If you scoop directly into the flour or cocoa container, it packs it down into the cup which could leave you with 1/4 cup or more of added dry ingredients.
- Room temperature eggs – It is very important to use room temperature eggs for two reasons. The first is that there are 7 large eggs in the batter, so adding 7 large CHILLED eggs will create a cold batter. When the cold batter hits the heat of the oven, it will take longer for that batter to reach the necessary temperature it needs to bake through.
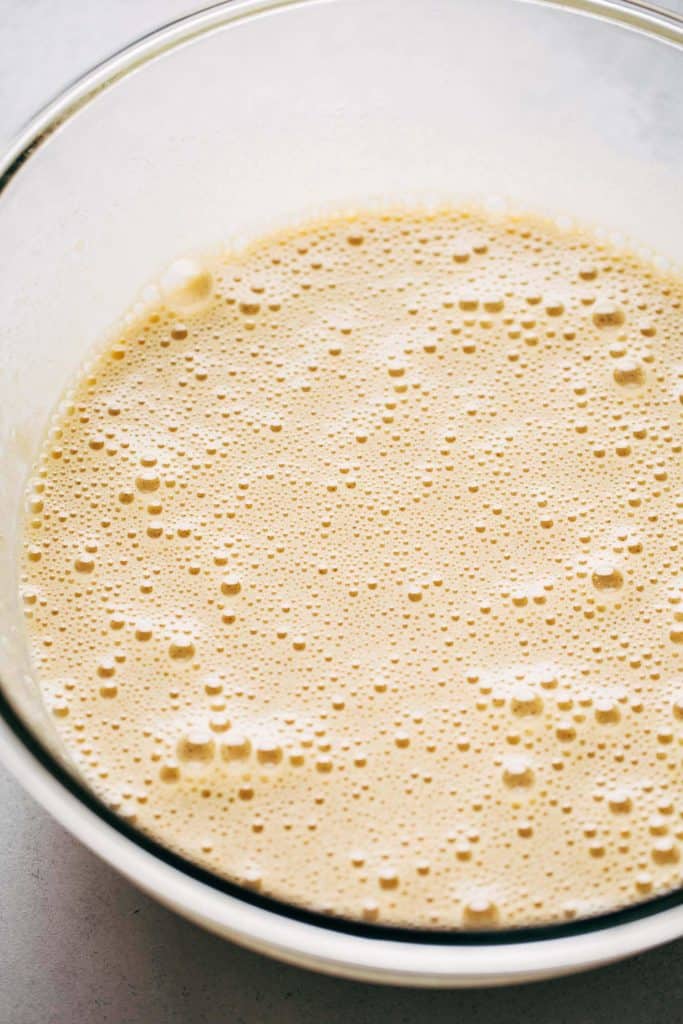
- Whipped eggs and sugar – To continue the previous tip, the second reason to use room temperature eggs is for the whipping process. One of the steps in this recipe requires you to whip together the sugar and eggs. By using room temperature eggs, this allows the eggs and sugar to easily dissolve into one. By doing so, the eggs will turn light and frothy which scatters tiny air pockets throughout the entire batter. This provides lift and structure to the cake.
- Carefully mix – I like to mix this cake by hand because it’s much easier to control the amount of force applied to the batter. In other words, it’s hard to over mix by hand. Because if you over mix the batter, the cake will fall in the center and turn a bit tough. To prevent this from happening, be careful when mixing in the dry ingredients. Stop right when they’re fully dissolved into the batter.

How to tell when the cakes are baked through
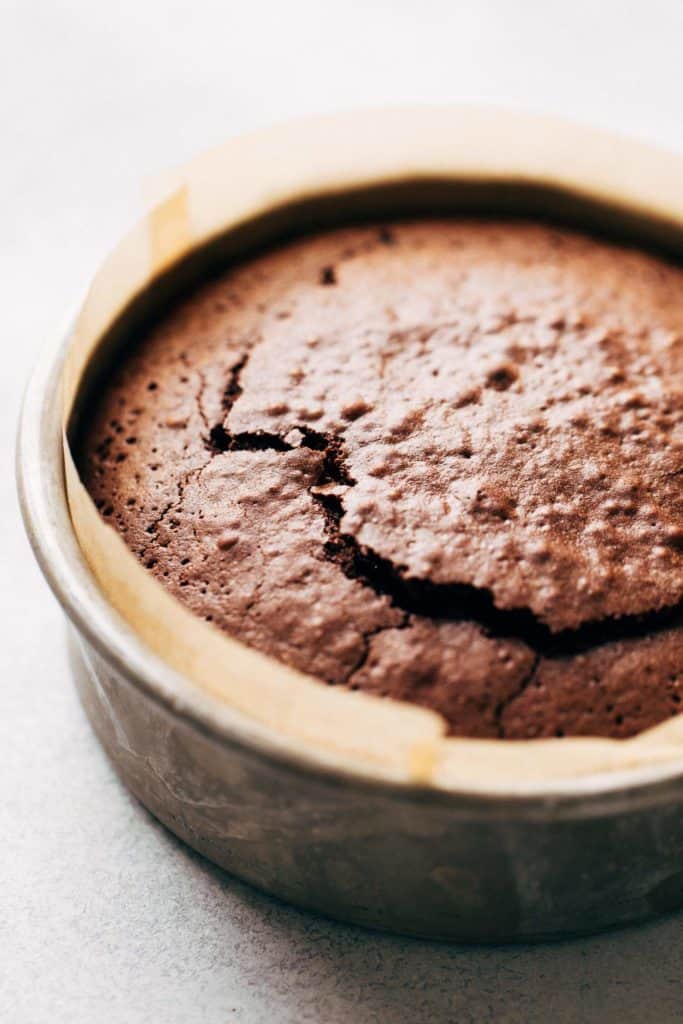
For a good fudgy brownie, the toothpick test never works. That’s because the batter in the center should remain somewhat wet and sticky – that’s how to achieve that signature fudgy texture. If it comes out clean, it’s a good indicator that the brownies are over baked.
So how can you test for doneness with a brownie CAKE? Well there are two signs to look for:
- They’re done with each cake layer is baked with a dome top and cracks running around the surface. The top should also look like a shell – just like the top of a brownie.
- As for the toothpick, stick it into one of the cracks of the cake. If it comes out with glossy and thin batter, it’s not ready. If it comes out with sticky but thick batter, it’s perfectly baked.

What are acceptable cake pan sizes for this recipe?
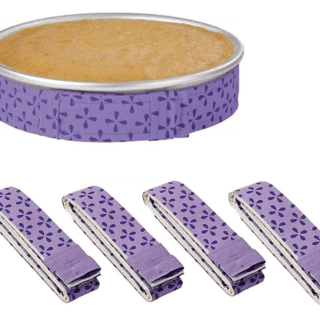
To get the most out of this recipe, three 6″ round cake pans are preferred. I love the thick and dense layers it provides, giving you that super fudgy texture right in the center.
If you don’t have 6″ cake pans, 8″ cake pans can also be used. They work just as well, but the cakes may have a slightly domed center. If that’s the case, level off the tops with a sharp knife once the cakes have completely chilled.
For either size, make sure to fully cover the inside of each pan with nonstick spray and parchment paper. Because of how rich this batter is, the cakes will stick to the bare pan.
Can I use gluten free flour?
I have not tested it, but I would suggest using a good one for one gluten free baking flour in place of the all purpose flour in this recipe. I recommend this one by Bob’s Red Mill. Just be careful when measuring as gluten free flour is more dense than regular flour. To ensure accuracy, use a food scale to weigh out your 1 cup of flour. The cake also may need 3-5 extra minutes in the oven.
How to store brownie cake
Make ahead – Your first option is to bake the cake layers ahead of time. To store them, allow the cake layers to cool at room temperature. Once they’re no longer warm, wrap each layer in plastic wrap and chill in the refrigerator. They’ll keep fresh for up to 2 days. Then frost and decorate as usual.
Unsliced completed – To store the entire completed and unsliced cake, I recommend leaving off the brownie topping for easy storage as it adds quite a bit of height to the cake. You can add the brownies when you’re ready to serve. Place the cake in a cake container if you can. If you don’t have a container large enough, store it bare as long as it’s unsliced. The whole cake will keep for a few extra days.
Sliced completed – To store the sliced cake, press plastic wrap up against the open section of the cake. This will prevent it from drying out. Then store based on the instructions for the unsliced cake above.
For more of my favorite chocolate recipes, check out my:
- Moist Chocolate Cake
- Fudgy Vegan Chocolate Cake
- Salted Dark Chocolate Brownies
- Better than Boxed Chocolate Fudge Brownies
- Chocolate Cheesecake
- Dark Chocolate Banana Bread
Make sure to tag me @butternutbakery on Instagram and leave a review below if you make this ultimate brownie cake. To pin this recipe and save it for later, you can use the button on the recipe card, the buttons above or below this post, or on any of the photos above. Happy baking!
Print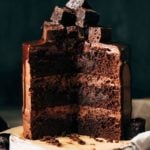
Fudgy Brownie Cake
- Total Time: 1 hour 40 minutes + 1 hour chilling
- Yield: 10-12 slices
Description
The ultimate cake for any chocolate lover – with layers of fudgy brownie cake, chocolate frosting, chocolate ganache, and a pile of brownies on top.
Ingredients
Brownie Cake
- 1 1/2 cups (330g) unsalted butter
- 4 oz semisweet chocolate, chopped
- 1 1/2 cups (300g) granulated sugar
- 1 cup (200g) light brown sugar, packed
- 7 large eggs, room temp
- 1 tsp vanilla extract
- 1 cup (128g) all purpose flour
- 1 cup (100g) unsweetened cocoa powder
- 1 tsp salt
Chocolate Frosting
- 1 cup (220g) unsalted butter, room temp
- 4 oz full fat cream cheese, room temp
- 1/2 cup (50g) unsweetened cocoa powder
- 4 cups (480g) powdered sugar
- 1 tsp vanilla extract
- Pinch of salt
Chocolate Ganache
- 4 oz semisweet chocolate, chopped
- 1/2 cup heavy cream
Brownie Options (for garnish)
Instructions
Brownie Cake
- *If you plan on baking brownies for garnish, do that first so they have time to chill and set.
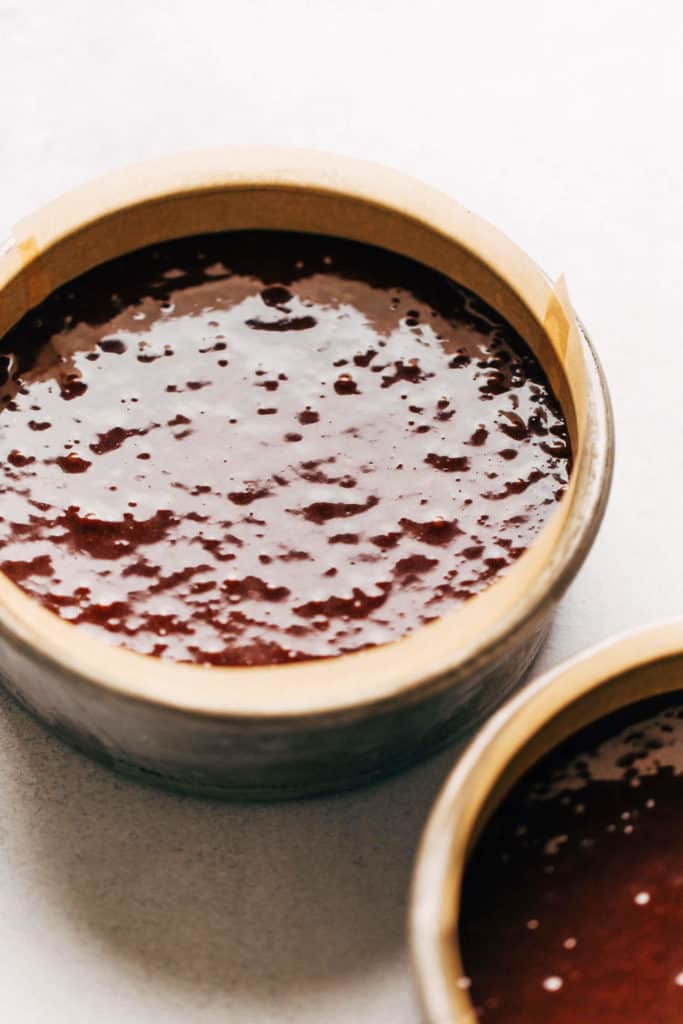
- Preheat the oven to 350F and prep (3) 6″ round cake pans or (3) 8″ round cake pans. Coat the entire inside with a thin layer of nonstick spray, then cover the bottom with a round sheet of parchment paper and line the sides with additional strips of parchment paper. The cake will stick to the sides of the pan otherwise, so make the entire inside is covered in parchment paper.
- In a heatproof bowl, add the butter and 4 oz chopped chocolate. Melt in 30 second intervals in the microwave until smooth. Set aside to cool.
- In a separate bowl, whisk together the flour, cocoa powder, and salt. Set aside.
- In a large mixing bowl, add the sugars, vanilla, and eggs (ensuring they’re at room temperature). Vigorously whisk either by hand or using an electric mixer. Whisk for about 2-3 minutes, or until the mixture lightens in color and turns frothy/bubbly.
- Continue mixing as you slowly pour in the cooled butter and chocolate. Whisk until combined.
- Sift in the dry ingredients and mix until smooth (careful not to over mix). The batter should be thin, but not watery.
- Evenly distribute the batter between the three cake pans. For 6″ cakes, bake for 35-40 minutes. For 8″ cakes, bake for 30-35 minutes.
- You know they’re ready when they’ve puffed in the center with deep cracks throughout the surface. Poke a toothpick into one of the cracks and test for doneness. It should come out with thick and somewhat dry streaks of batter (see pictures in post for reference).
- Allow the cakes to cool inside the pan for about 30 minutes, then turn them out onto a cooling rack. You may need to run a knife between the parchment paper and inside of the pan to help release them.
- Let the cakes cool completely before assembling. To speed up the process, chill the cakes in the refrigerator for about one hour. You can also chill them overnight. Just let them cool completely at room temp before wrapping in plastic wrap and storing in the refrigerator.
Chocolate Frosting
- In a bowl using a hand or stand mixer with the whisk attachment, mix together the room temperature butter and cream cheese until smooth.
- Mix in the cocoa powder, followed by the powdered sugar one cup at a time.
- Mix in the vanilla and salt. If the frosting is too thick or dry, mix in 1-2 tablespoons of milk as needed.
- Spread a layer of frosting between each cake layer. Then before frosting the outside of the cake, place the cake in the refrigerator for about 20 minutes to allow the center layers to set.
- Frost the outside of the cake, smooth out the sides and top, and return the cake to the refrigerator while you make the ganache.
Chocolate Ganache
- Add the chopped chocolate to a bowl and the heavy cream to a heatproof container, like a measuring glass.
- Heat the heavy cream in the microwave for about 1 minute, or until steaming and bubbling.
- Pour the hot cream over the chocolate and let it sit for 30 seconds, ensuring all of the chocolate is submerged in the cream.
- Then whisk together until completely smooth and glossy. Let it cool for about 5 minutes.
- Pour the ganache into the very center of the top of the cake, then use an offset spatula or spoon to push the ganache out towards the edges to allow it to drip down the sides.
- Top the cake with bite-sized brownie pieces, or leave it as is. Store the cake in the refrigerator until you’re ready to serve. Enjoy!

- Prep Time: 1 hour
- Cook Time: 40 minutes
Join Our Community


Meet Jenna
I’m the creator, baker, and photographer behind Butternut Bakery. Here I share desserts for every diet because I believe everyone should have a chance to indulge!

I made this cake the only thing difference, I used mini choc chips, the batter was very thick not thin but cakes came out beautiful. Maybe the ingredients in chocolate chips made a difference.
This cake was absolutely amazing I’m so impressed. Thank you!
I took some pics but can’t see where to upload.