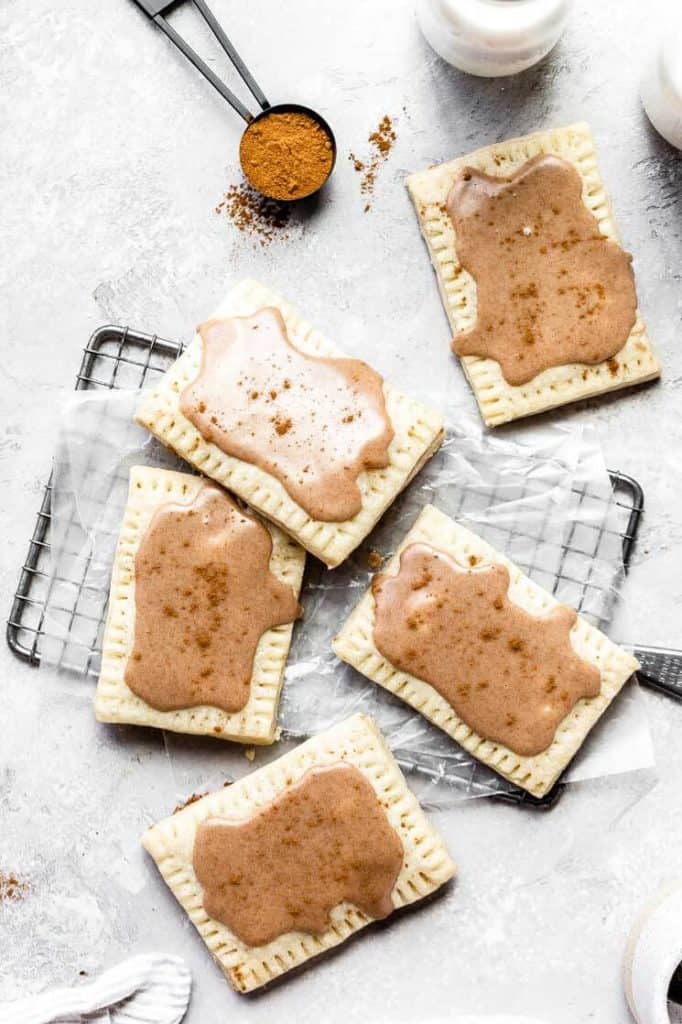
Homemade Brown Sugar Cinnamon Pop Tarts
Get ready to feel nostalgic with these homemade brown sugar cinnamon pop tarts! This was by far my favorite pop tart flavor growing up so naturally, I had to make them from scratch. If you’re a little intimidated by making homemade pop tarts, not to worry! I’ve included step-by-step photos with in depth instructions to help you perfect this recipe.
This post is sponsored by Bob’s Red Mill but all thoughts and opinions are my own. Thank you for supporting the brands that make Butternut Bakery possible!
HOW TO MAKE THE HOMEMADE BROWN SUGAR CINNAMON POP TART DOUGH
The pastry portion of this pop tart recipe is made just like pie dough. You start with all of the dry ingredients in a large bowl, cut in the chilled fats, and hydrate with water.
For this recipe you will need:
- Bob’s Red Mill Organic All Purpose Flour
- Salt
- Sugar
- Unsalted butter, chilled and cubed
- Vegetable shortening, chilled
- Ice water
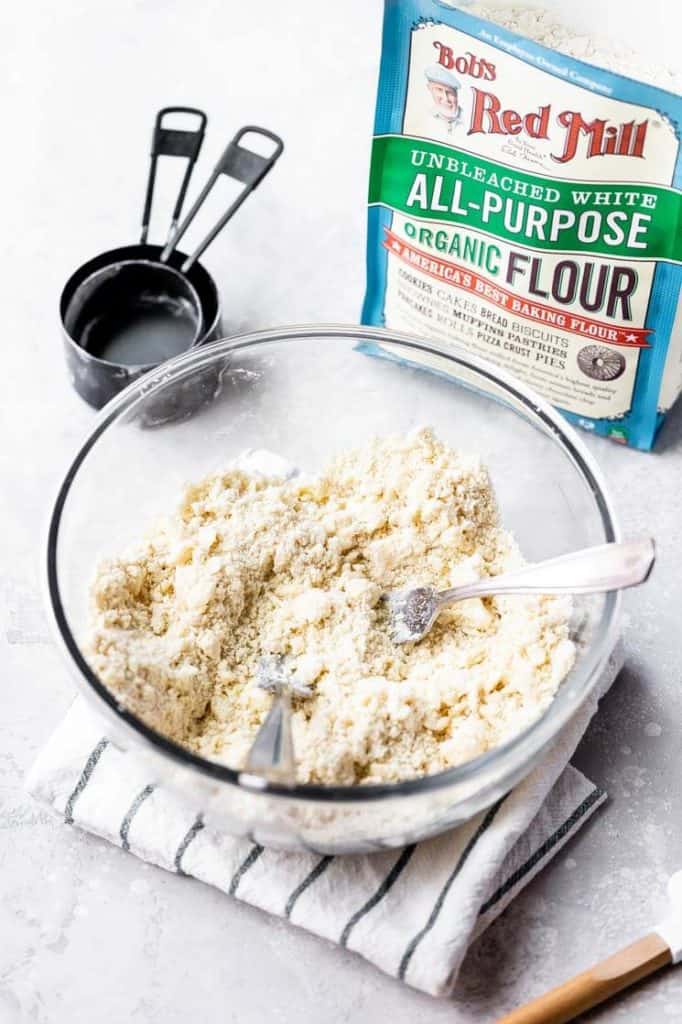
In a bowl, whisk together the flour, sugar, and salt. For recipes like these where flour is a major ingredient, I prefer to use Bob’s Red Mill Organic All Purpose Flour. It has the perfect texture because it’s finely milled organic wheat. Not only that, but it’s completely unbleached and unenriched to create a really high quality flour that’s perfect for baking delicious desserts!
The next step is to drop in the chilled butter and vegetable shortening. It’s VERY important that both are cold because we still want some chunks of fat to remain when the dough is mixed together.
These butter chunks are what help create a flaky pastry. When baked, water begins to escape from the butter and evaporate. What’s left behind are tiny little air pockets between the gluten strands. This is what gives you that delicate flaky texture.
The shortening also plays an important role in the pliability of the dough. Since we’ll be rolling, cutting, and shaping the dough, we definitely don’t want it to fall apart on us. Shortening allows the dough to hold its shape before and during baking. And since shortening lacks flavor, pairing it with butter gives the dough it’s richness.
To work the two into the dry ingredients, you can either use a pastry cutter or two forks. You want to “cut” the butter and shortening into the flour mixture until you’re left with a lumpy sand-like texture (see photo below). This takes a little bit of elbow grease but is so worth it for delicious homemade pop tarts!
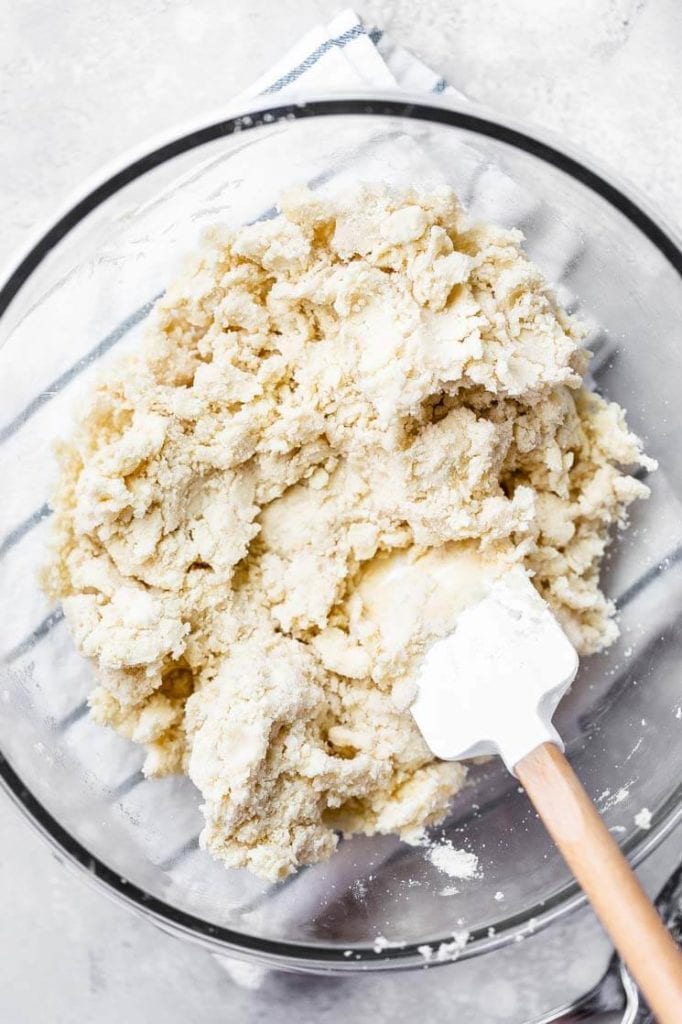
Switch to a rubber spatula and add in 2 tablespoons of ice water. Dip into a glass of water filled with ice cubes because we want the water to be REALLY cold.
Mix that into the dough and then add 2 more tablespoons. By the end, you want the dough to look like the picture below, formed into one mass that can hold its shape but also easily break apart. You’ll know it’s ready when the dough sticks to the spatula. If you aren’t quite there yet, add in one more tablespoon.
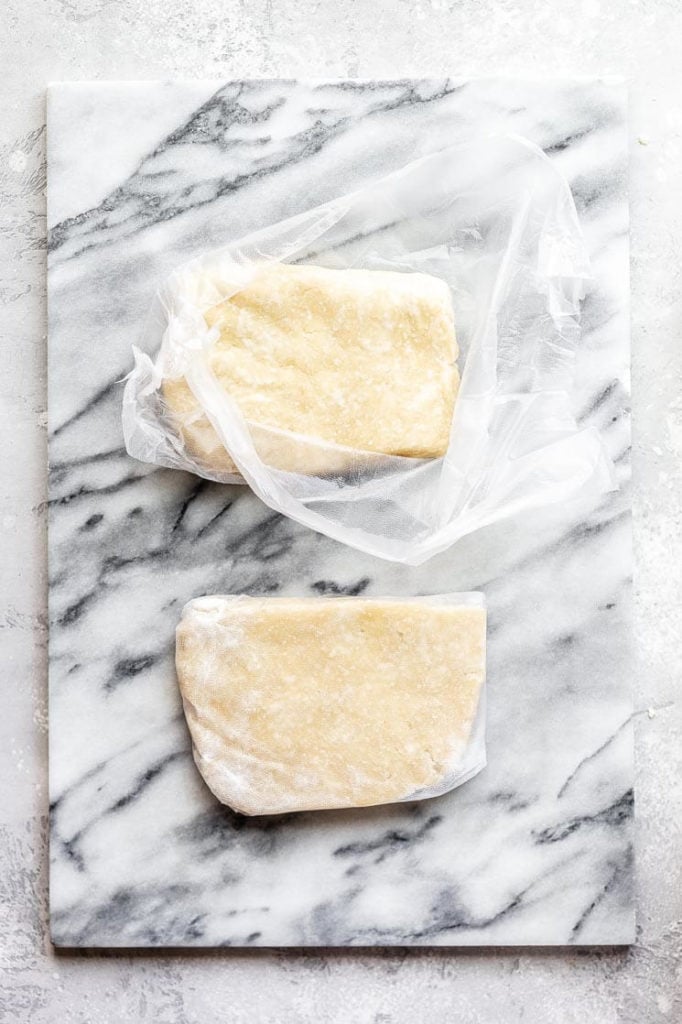
Dump the dough out onto a lightly floured surface and form into a rounded rectangle shape – it doesn’t have to be perfect.
Slice down the middle and wrap each half in plastic wrap. Refrigerate for 2 hours or overnight and make sure you place them side by side, not on top of each other. Stacking them will prevent the two halves from chilling at the same rate.
HOW TO SHAPE HOMEMADE POP TARTS
Once the dough has completely chilled, take one half out of the fridge and let it rest at room temperature for about 10 minutes. We need it to soften just a bit so it doesn’t crack apart when rolling it out.
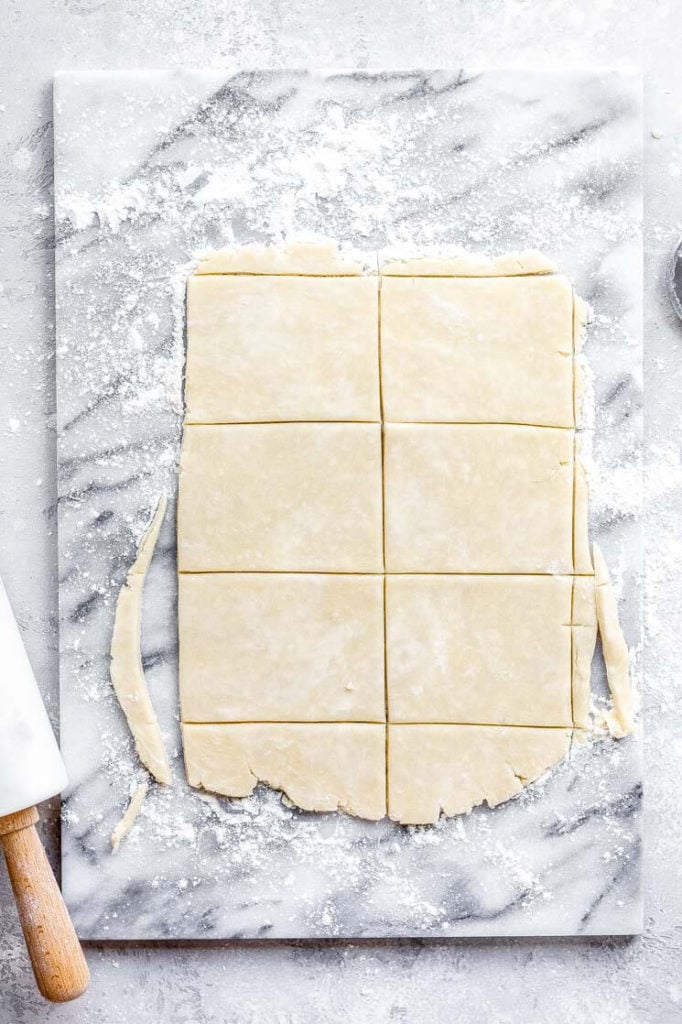
Roll the dough out onto a floured surface to about ⅛ an inch thick and try your best to roll it into a 9 x 13 inch rectangle.
Using a pizza cutter, slice 6 rectangles that are all 3 x 4 inches (see picture below). Place on a tray lined with wax paper and pop them back in the fridge. Repeat with the other half of dough.
By this point, you should have 12 rectangles all sitting in the fridge. Preheat the oven to 350F and then start on the brown sugar cinnamon filling.
ADDING THE HOMEMADE BROWN SUGAR CINNAMON POP TART FILLING
We’re in the home stretch! Now we just have to make the filling and seal up these homemade pop tarts.
In a small bowl, mix together all of the filling ingredients:
- Brown sugar
- Cinnamon
- Bob’s Red Mill Organic All Purpose Flour
- Unsalted butter, melted
- Maple syrup
The butter helps create that ooey gooey center and the maple syrup prevents the filling from getting too gritty. Plus it adds delicious flavor!
Once that’s well combined, take 6 pastry rectangles out of the fridge and transfer to a large baking sheet lined with parchment paper. Add 1 tablespoon to the center of each rectangle and spread it even, leaving a small lip around the edge (see picture below). This gap is needed for sealing the pop tarts.
Take the remaining 6 rectangles out of the fridge and use a toothpick to poke 6-7 holes concentrated in the center of each rectangle.
Next, dab the edges of the filled rectangles (where you left that gap around the edges) with some water. This is the glue that holds the two halves of the pop tarts together.
Take the rectangles that you just poked holes into and place on top of the filled pastries.
Seal the deal by crimping the edges with a fork and they are ready to bake!
But make sure that the pop tarts are still somewhat chilled. If they’ve been sitting out a little too long during this process, pop them back in the fridge for around 10 minutes before baking.


BAKING THE BROWN SUGAR CINNAMON POP TARTS
It’s surprisingly easy to over-bake these homemade pop tarts. Mainly because they hardly change color but there are a few signs you can look for to ensure they’re done.
First and foremost, bake for 25 minutes and add on one minute at a time until they’re done. This will ensure you don’t toast the edges too much.
When they’re done, the edges will have the slightest golden color and the center will look dull. The center will also look pretty pale and under baked (that’s the tricky part) but I assure you, they’re done!
Let the pop tarts rest on the baking sheet for about 10 minutes. They’ll still be pretty soft at this point, so allowing them to cool here first makes it much easier to transfer them over to a cooling rack.

HOMEMADE FROSTED BROWN SUGAR CINNAMON POP TARTS
Did I mention that these pop tarts have a delicious cinnamon icing on top? Because they do! And it’s very quick and easy to whip up.
All you have to do is mix together some powdered sugar, cinnamon, vanilla, and a bit of milk.
The trick is to get just the right consistency. You want the icing to run off your spoon in a steady stream but not too thin to where it completely disappears back into the bowl.
If the icing falls back into the bowl and disappears after about 2 seconds, it’s ready. By disappears, I mean you can see exactly where the icing landed before it just melted right back into the bowl and, well, disappeared.
If it’s still too thin, add 1 tablespoon of powdered sugar. If it’s too thick, add about 1 teaspoon of milk.
Spoon the icing on to your cooled pop tarts. Work slow here and use just a smidge less than you think you need to. Dollop some icing in the center and slowly work it out to the edges. It will naturally begin to fall off the sides.
Sprinkle with some extra cinnamon on top and you’re done!

HOW TO STORE HOMEMADE POP TARTS
These pop tarts are best enjoyed slightly warm since that’s when the filling is nice and soft. If by some off chance they don’t get devoured all at once, keep them in an air-tight container at room temperature for up to 5 days.
You can either eat them as is, pop them in the microwave, or toast them in a toaster oven. Unfortunately the frosting doesn’t set like original pop tarts so they’d make a huge mess in an actual toaster! But they just need a few seconds of heating up and they’re good to go.
If you have any other questions about the baking process or what to do with them after, leave a comment below!

For more cinnamon recipes, check out my:
Make sure to tag me @butternutbakery on Instagram and comment below if you make these Homemade Brown Sugar Cinnamon Pop Tarts. To pin this recipe and save it for later, you can use the button on the recipe card, the buttons above or below this post, or on any of the photos above. Happy baking!
Print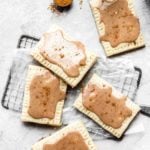
Homemade Brown Sugar Cinnamon Pop Tarts
- Total Time: 1 hour + 3 hours chilled
- Yield: 6 pop tarts
Description
Homemade brown sugar cinnamon pop tarts with a flaky pastry, buttery cinnamon sugar filling, and a sweet cinnamon icing. They’re like the grown up version of a childhood classic!
Ingredients
Pop Tart Dough *see notes for GF option
- 2 1/2 cups Bob’s Red Mill Organic All Purpose Flour
- 1 tsp salt
- 1 tsp sugar
- 3/4 cup unsalted butter, chilled and cubed
- 6 tbsp vegetable shortening, chilled
- 4–5 tbsp ice water
Brown Sugar Cinnamon Filling
- 1/2 cup light brown sugar
- 2 tsp cinnamon
- 1 tbsp Bob’s Red Mill Organic All Purpose Flour
- 1 tbsp unsalted butter, melted
- 2 tsp maple syrup
Cinnamon Icing
- 1 cup powdered sugar
- 1 tsp cinnamon
- 1/4 tsp vanilla extract
- 1–2 tbsp milk
Instructions
Pop Tart Dough
- In a large bowl, whisk together the flour, salt, and sugar. Also fill a glass with ice water and set aside.
- Drop in the chilled and cubed butter and shortening into the flour mixture.
- Cut in using two forks or a pastry cutter. After a few minutes of work, you should be left with a sand-like consistency with a few medium sized lumps (see picture above).
- Add in 2 tablespoons of ice water and combine using a rubber spatula. Gently mix in 2 more tablespoons of ice water. The dough should come together and form a mass, but still easily fall apart. It’s ready when the dough starts to stick on to the spatula (see picture above).
- Dump dough out on to a lightly floured surface. Form into a rectangle-like shape and cut in half. Wrap each separately in plastic wrap and store in the fridge for at least 2 hours or overnight.
- When chilled, take one half out of the fridge and let it sit at room temperature for about 15 minutes. This makes it much easier to roll out.
- On a floured surface, roll into 9 x 13 inches and about 1/8 inch thickness. Using a pizza cutter, slice six 3 x 4 inch rectangles and transfer to a small tray lined with wax paper.
- Place them in the fridge and repeat for the second half of dough.
- With 12 rectangles now in the fridge, mix together the filling.
Brown Sugar Cinnamon Filling
- Combine all of the ingredients in a small bowl and preheat the oven to 350F.
- Take 6 of the rectangles out of the fridge and place on a large baking sheet lined with parchment paper. Ensure they’re evenly spaced out.
- Add 1 tablespoon of filling to the center of each rectangle. Spread it even and leave a gap around the edges (see picture above).
- Take the remaining 6 rectangles out of the fridge and poke 6-7 holes using a toothpick. Set aside.
- Dab the edges of the filled rectangles with some water and place the perforated rectangles on top. Gently press the edges to seal.
- Crimp the edges with a fork and then bake for 25-28 minutes. They should come out dull on top with a very very light golden edge (see picture above).
- Let them cool on the baking sheet for about 10 minutes then transfer to a cooling rack.
Cinnamon Icing
- Combine all of the ingredients in a small bowl and mix until smooth. It should be thin enough to drizzle back into the bowl and fall in a ribbon. It’s the right consistency when it disappears back into itself after about 1 second.
- Spoon into the center of the cooled pop tarts and gently spread it towards the edges. It will begin to slowly fall off the sides.
- Sprinkle with a little extra cinnamon and dig in!
- They’re best enjoyed warm. Store in an air-tight container at room temperature.
Notes
GLUTEN FREE – Use the pie dough recipe from my gluten free peanut butter and jelly pop tarts
- Prep Time: 35 minutes
- Cook Time: 25 minutes
Join Our Community


Meet Jenna
I’m the creator, baker, and photographer behind Butternut Bakery. Here I share desserts for every diet because I believe everyone should have a chance to indulge!


Would a royal icing set better when wanting to reheat or would it still melt?
I unfortunately don’t have vegetable shortening. Is there anything I can use as a substitute? These look amazing!
This sounds amazing. Perfect fall pop tart!
Question, could I mix the dough in a stand mixer?
How thin should the dough be rolled out?
Homemade cinnamon sugar pop tarts are always a treat! Yours look so scrumptious!! Thank you for all the great process shots.
Do you think these would be able to be made with GF flour?