Blackberry Chocolate Cake
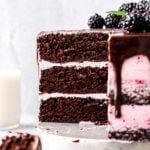
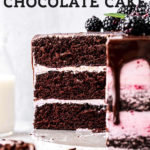
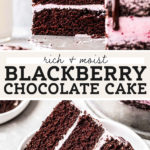
This chocolate cake is the perfect balance of rich and slightly tart. It’s smothered in a silky blackberry buttercream with homemade blackberry jam between each layer. What I love most about this chocolate cake recipe is how easy it is to sink your fork into. It’s incredibly soft, moist, and full of chocolate flavor.
This post is sponsored by Rodelle but all thoughts and opinions are my own. Thank you for supporting the brands that make Butternut Bakery possible!

Ingredients for the best chocolate cake
Making the perfect homemade chocolate cake is simple, but it all comes down to the ingredients. It’s important to use quality ingredients to create a rich, dark, and flavorful chocolate cake.
The most important ingredient in this and any chocolate cake is the cocoa powder. Whenever I’m baking anything chocolate, I always use cocoa powder by Rodelle. Their baking cocoa is dutch processed, giving it a rich color and flavor that enhances any chocolate dessert.
For this recipe, I used the Rodelle Organic Baking Cocoa. It’s incredibly rich and what I love most is how I don’t have to sift it like I would with every other cocoa powder. This Organic Baking Cocoa is smooth with no clumps and seamlessly blends into the batter.
The two other star ingredients in this chocolate cake are the buttermilk and oil. If I’m ever baking a cake that isn’t plain vanilla, I typically use oil. The reason being is that it makes any cake SO moist. The downside is that if there’s no other flavor in the cake, like chocolate, you will be able to taste the oil.
Lastly, the buttermilk keeps this cake super soft. It’s the type of cake where your knife just glides right through when cutting yourself a slice. The acidity of the buttermilk helps break down the gluten strands to create a tender and moist chocolate cake.

What makes this a simple chocolate cake recipe
This is such an easy chocolate cake recipe. The batter basically consists of three simple steps and it’s so quick to make.
Using the reverse creaming method to ensure a tender cake, you start by whisking together all of the dry ingredients, including the sugar.
In another bowl, mix together all of the wet ingredients minus the hot water. Mix the wet into the dry until it’s almost blended. Finally, mix in the hot water. This helps enhance the chocolate flavor.
The finished batter will be very thin. Pour it into 3 round 8 inch baking pans, greased and lined with parchment paper on the bottom.
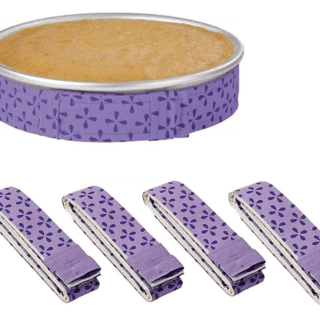
I like to bake mine using cake strips which prevent the edges of the cake from baking too quickly, causing a dome shaped cake. The strips keep the cakes nice and even so there’s no need to level them off when assembling the cake.

How to make homemade blackberry jam
Before we even get to the chocolate cake, the very first step in this recipe is to make the blackberry jam. This is spread between each layer and also mixed into the buttercream.
It’s very easy to make but takes some patience. Add 3 cups of blackberries to a saucepan along with 1/4 cup of sugar and the juice of 1 lemon (about 1 tbsp).
On medium heat, cook down the berries until they start to break apart. You can help them along with carefully mashing them with your mixing spoon. Keep mixing until the berries are completely broken down and the mixture starts to thicken. This takes about 20 minutes.
Remove from the heat and let it cool for 15 minutes. Then, push the mixture through a fine mesh sieve. You’ll really have to press it through the strainer as there’s tons of pulp and seeds to work through.
Place the jam into a container and let it cool in the fridge before using.

How to make blackberry Swiss meringue buttercream frosting
For this recipe, I chose to work with a blackberry Swiss meringue buttercream. It requires a couple extra steps as opposed to the typical American buttercream which primarily consists of butter and powdered sugar.
Swiss meringue buttercream is a whipped mixture of egg whites and sugar, and then butter is added later. It creates a very stable buttercream that holds strong when chilled. It’s also silkier than American buttercream and not as sweet which is another reason why I opted for this technique.
Start by mixing together the egg whites and sugar in a heat safe bowl. Over a pot of simmering water, NOT boiling, whisk the egg whites and sugar together until they reach 160F. It’s ready when you can no longer feel any sugar granules in the mixture.
To make this easy, I used the metal bowl of my stand mixture for the egg white mixture. Once the eggs are heated properly, I just pop it back on the stand mixer for the next step. With the whisk attachment, whip the egg whites on high until you reach stiff peaks.
Working with room temperature butter and the mixer on low, add one tablespoon at a time until each are fully mixed in. Then, mix in 3 tablespoons of the blackberry jam.
It’s important for your butter be at the perfect temperature. If the butter is too warm, you’ll end up with a soupy buttercream. Luckily it’s an easy fix. Just pop it in the fridge for about 10 minutes then whip again. It should thicken and come together.
If the butter is too cold, your buttercream will turn out curdled and lumpy. Just kick up the mixing speed and whip a little bit longer until the buttercream smooths out.

Assembling the blackberry chocolate cake
Once the cake, blackberry jam, and blackberry buttercream are prepared, it’s time to assemble. First, start with the cake.
If you didn’t use cake strips when baking, you might have uneven layers. If that’s the case, use a cake leveler to even out the tops. This is important because we need the layers to stack flat against each other for a symmetrical cake.
Between each cake, spread an even layer of the blackberry buttercream. Then spread about 1 tablespoon of the blackberry jam on top.
Repeat this process until you reach the top. Do not add blackberry jam to the very top of the cake.
Place the cake in the fridge for about 5 minutes so the center layers can set.
Evenly coat the entire outside of the cake in buttercream then use a cake scraper to smooth out the sides. For the more naked look like I did here, keep scraping until the chocolate layers start to peak through.
Smear very tiny amounts of the blackberry jam all along the outside of the cake then scrape again. If you added too much jam, add more buttercream then scrape until you reach the blended look seen here.
Top with the chocolate cake drip. Simply heat the cream in the microwave then pour it over the chopped chocolate. Mix it together until smooth then pour it over the cake.

For more delicious chocolate desserts, check out my:
Make sure to tag me @butternutbakery on Instagram or comment below if you make this Blackberry Chocolate Cake. To pin this recipe and save it for later, you can use the button on the recipe card, the buttons above or below this post, or on any of the photos above. Happy baking!
Print
Blackberry Chocolate Cake
- Total Time: 2 hours 40 minutes
- Yield: 3 layer 8″ cake
Description
This blackberry chocolate cake is the perfect balance of sweet, rich, and tart. This moist chocolate cake is covered in blackberry buttercream with homemade blackberry jam spread between each layer.
Ingredients
Chocolate Cake
- 2 cups all-purpose flour
- 2 cups granulated sugar
- 3/4 cup Rodelle Organic Baking Cocoa*
- 2 1/4 tsp baking soda
- 1/2 tsp baking powder
- 1 tsp salt
- 1/2 cup buttermilk
- 1/2 cup vegetable or canola oil
- 2 tsp vanilla extract
- 3 large eggs
- 1 cup hot water
Blackberry Jam
- 3 cups fresh blackberries
- 1/4 cup granulated sugar
- 1 tbsp lemon juice
Blackberry Buttercream
- 5 large egg whites
- 1 1/4 cup granulated sugar
- 1 1/2 cups unsalted butter, room temp
- 3 tbsp homemade blackberry jam
Chocolate Ganache
- 2 oz dark chocolate, chopped
- 2 oz heavy cream
Instructions
Blackberry Jam
- Add the blackberries, sugar, and lemon juice to a saucepan over medium heat.
- Cook until the berries start to break down. You can help them along by mashing them with your mixing spoon.
- Continue to cook and stir until the mixture begins to thicken and the berries are completely broken down. The whole process takes about 20 minutes.
- Remove from heat and let it cool for about 10 minutes.
- Press the mixture through a fine mesh sieve. You really have to work it through because there’s a lot of seeds and pulp to separate out.
- Place your strained blackberries into the fridge and start on the chocolate cake.
Chocolate Cake
- Preheat the oven to 325F and prep 3 round 8 inch baking pans. Spray them with some nonstick spray, coat them in the Rodelle Organic Baking Cocoa, and line the bottoms with parchment paper.
- In a large bowl (use your stand mixer bowl if using), mix together all of the dry ingredients including the sugar.
- In a separate bowl, mix together the wet ingredients (buttermilk, oil, vanilla, and eggs) minus the hot water.
- With the mixer on medium-low speed, pour the wet ingredients into the dry ingredients in a slow and steady stream.
- Once it’s almost combined, slowly mix in the hot water. The batter will be very thin.
- If using cake strips, which I highly recommend for an even bake, dampen and wrap them around the prepared pans.
- Evenly distribute the batter between the three pans and bake for 25-30 minutes or until a toothpick in the center comes out clean.
- Let the cakes cool in their pans for 20-30 minutes or until the pans and cakes are completely cooled.
- Turn out the cakes and wrap individually in plastic wrap. Because the cake is so soft and tender, you’ll need to refrigerate the layers for about an hour to firm up a bit. This makes it easier to assemble the cake.
Blackberry Buttercream
- Let your butter sit at room temperature for about 30 minutes before starting.
- Pour about an inch of water into a medium saucepan and bring it to a simmer. Don’t let it come to a boil.
- If using an electric mixer, place the egg whites and sugar into the metal bowl of your mixer and place it over the simmering water.
- Whisk the egg whites and sugar until it reaches 160F. This should only take about 5 minutes but to test and make sure it’s done, rub a bit of the mixture between your fingers and if you can’t feel any sugar granules…it’s ready.
- Place the bowl back on the mixer and whisk on high speed for about 10 minutes or until you reach stiff peaks.
- You want the bowl to be somewhat cool before adding the butter. Once ready, drop the mixer to low and mix in 1 tablespoon at a time. Make sure it is mixed in before adding the next.
- Lastly, mix in the 3 tablespoons of blackberry jam. By this time, you should have a silky buttercream. If you’re having trouble with the consistency, I wrote instructions in the post above as to how to fix the issue.
Assembly
- Take the cakes out of the fridge and unwrap. Level them off if needed.
- Spread an even layer of the buttercream on top of the first layer. Spread 1 tablespoon of the blackberry jam on top of the buttercream then place your second layer of cake. Repeat.
- Once you’ve placed the final layer, pop the cake in the fridge for about 10 minutes so the center can set.
- Cover the entire outside in the blackberry buttercream and even out the sides with a cake scraper.
- Dot tiny bits of the blackberry jam all throughout the cake and run the cake scraper along the edge. If you added too much, spread on a bit more buttercream then scrape again to get the berry swirl effect you see here.
- Place the cake back in the fridge and prepare the ganache.
- Add the chopped chocolate to a bowl. Heat the heavy cream in a separate bowl in the microwave for about 1 minute.
- Pour the cream over the chocolate and let it sit for a minute. Then mix until smooth.
- Gently spread it over the top of the cake and let it drip down the sides.
- Top with some extra blackberries and place in the fridge for 15 minutes to set. Enjoy!
Notes
- *Rodelle products are available nationwide. Visit the Where To Buy section on Rodelle’s website to find a retailer near you or purchase online at Walmart and Amazon.
- Prep Time: 2 hours
- Cook Time: 40 minutes
Join Our Community

Meet Jenna
I’m the creator, baker, and photographer behind Butternut Bakery. Here I share desserts for every diet because I believe everyone should have a chance to indulge!


Thanks for this recipe! I made this for my birthday and it was classy and delicious. I screwed up the layering a bit — should’ve trimmed them flat for a more professional final look — But it didn’t matter once I’d piled some fresh blackberries on top. The consistency and moistness of the cake is so good. Ditto on the buttercream which is *very* smooth. I would probably prefer this w/ raspberries over blackberries though — I think the flavor is just a bit stronger / sharper.
This is my go-to dessert to use the blackberries from our blackberry bush! It is moist, sweet, tart, and perfectly balanced. Our blackberries grow slightly tart so my version might be less sweet than others. Still, I find myself using this recipe at the end of every summer. Thank you for a fantastic recipe!
can this recipe be used for 9 inch pans too? or are there any changes?
Thanks for the recipe. Can I use hot milk instead of hot water for this cake?
Question:
Do I use the blackberries with the seeds or the part that was drained? Not sure which is considered the “jam”.