Description
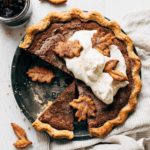
This custard-based pie is made with apple butter and topped with a layer of cinnamon sugar – all baked in a flaky gluten free pie crust!
Ingredients
Gluten Free Pie Crust
- 2 1/2 cups (345g) Bob’s Red Mill 1-to-1 Gluten Free Baking Flour
- 1 tbsp sugar
- 1/2 tsp salt
- 1 cup (220g) unsalted butter, cold and cubed (European style preferred)
- 1/4 cup ice water
- 1/4 cup (60g) sour cream
Apple Butter Pie Filling
- 1 cup (270g) apple butter
- 3 large eggs, divided
- 1/4 cup (50g) dark brown sugar, packed
- 1 tbsp Bob’s Red Mill 1-to-1 Gluten Free Baking Flour
- 1/2 tsp cinnamon
- 1/2 tsp salt
- 14oz sweetened condensed milk
- 1 tsp vanilla
Topping
- 1 1/2 tbsp granulated sugar
- 3/4 tsp ground cinnamon
- Homemade or store bought whipped cream
Instructions
Gluten Free Pie Crust
- In a large bowl, whisk together the gluten free flour, sugar, and salt.
- To the bowl, add the cubed butter and toss to coat the cubes in flour.
- Using your fingers, two forks, or a pastry cutter, work the butter into the flour until the butter is evenly dispersed into small pea sized lumps. If the butter starts to melt, place the bowl into the refrigerator to chill for 30 minutes before continuing.
- Pour in the 1/4 cup of ice water and stir to evenly hydrate. Then mix in the sour cream.
- If the dough looks too dry and crumbly, try working it together with your hands. If it’s easily able to form into a large mass, it’s ready. If it’s still too crumbly, mix in 1 tbsp of water at a time until it’s properly hydrated.
- Split the dough into two pieces, one that’s slightly larger than the other. One will be for the bottom crust and the other will be for the pie leaves on top.
- Place the two pieces of dough onto two separate sheets of plastic wrap. Form into a 1-inch thick disk and wrap tightly. Chill for at least 1 hour.
- After 1 hour, remove the larger piece of the pie dough and let it sit at room temperature for about 10 minutes. Then, roll it out onto a well-floured surface using the gluten free flour.
- As you roll, continue to flour the surface underneath. Do this more often in the beginning stages as it’s easy to move around the dough when it’s more compact. Continuous flouring early on will prevent the pie dough from sticking to the surface when it comes time to transfer it to the pie dish.
- It may crack in a few places, so I like to switch off between rolling the dough and pushing it into shape using my fingers.
- Once it’s rolled out to a diameter that’s about an inch larger than your pie dish, carefully roll the pie dough onto your rolling pin and then roll it back into the pie dish. Carefully lift the edges and press the pie dough into the sides of the dish. Use your fingers to patch up any cracks.
- Tuck under any excess overhang and crimp the edges.
- Take 1 egg allotted for the pie filling and separate the egg white and the yolk. Save the yolk for the filling and use the egg white to brush the bottom and sides of the pie dough. This will create a barrier between the pie filling and the pie dough, so the bottom will not turn soggy.
- Freeze the pie shell until the egg white is frozen solid (about 15 minutes). While it freezes, preheat the oven to 400F and roll out the second half of dough.
- Press out the leaves using cookie cutters (I used these) and transfer to a small baking sheet lined with parchment paper. Place the pan in the refrigerator.
- Once frozen, tear off a square sheet of parchment paper that’s a bit larger than the pie dish. Wrinkle it up into a ball and then open the sheet (it’s easier to mold into the pie shell when it’s wrinkled). Place into the pie shell and fill with pie weights or dry beans (see picture in post for reference).
- Bake the shell and leaves for 15 minutes. Then remove the pie weights and parchment paper and bake for another 5-8 minutes, or until the center no longer looks soft and raw. If the leaves are golden brown by the 15 minute mark, you can remove those from the oven. If not, bake for another 5 minutes with the pie shell.
- Make the cinnamon sugar topping and toss to coat the warm pie leaves. Reserve the rest of the mixture for the pie filling.
- Allow the pie shell to cool while you make the pie filling.
Apple Butter Pie Filling
- In a large bowl, whisk together the apple butter, 2 large eggs + 1 egg yolk, and sugar.
- Whisk in the flour, cinnamon, and salt.
- Finally whisk in the sweetened condensed milk and vanilla.
- Pour the filling into the pie shell and top the rest of the cinnamon sugar mixture.
- Bake at 400F for 10 minutes. Then reduce to 350F and bake for 30-40 minutes.
- Allow the pie to cool at room temperature for 30 minutes, then transfer to the refrigerator to chill uncovered for at least 2 hours to set. It can also be left overnight.
- Once it’s ready, top with whipped cream and enjoy!
- Prep Time: 1 hour
- Cook Time: 40 minutes
Keywords: apple butter, apple butter pie, gluten free pie, pie dough, gluten free pie dough

