Description
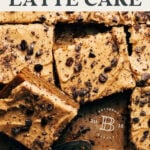
I can guarantee you’ve never had a cake that tastes like this. Very moist brown butter, vanilla bean, and espresso cake is topped with a very unique toasted milk vanilla bean frosting. The flavors are so rich, so different, and absolutely incredible!
Ingredients
Toasted Vanilla Espresso Cake
- 1 cup (224g) unsalted butter
- 1 cup (200g) granulated sugar
- 1 cup (200g) light brown sugar, packed
- 2 large eggs
- 1 tbsp vanilla bean paste
- 1 cup (240g) sour cream
- 1 tsp baking soda
- 1/2 tsp kosher salt
- 2 cups (256g) all-purpose flour
- 1 tbsp instant espresso
- 1/2 cup warm water
Toasted Milk Frosting
- 1/4 cup (40g) dry nonfat milk powder
- 1/3 cup (83g) milk, room temp
- 3/4 cup (168g) unsalted butter, room temp
- 2 cups (220g) powdered sugar
- 1 tbsp vanilla bean paste
- Chocolate covered espresso beans, chopped for topping
Instructions
Toasted Vanilla Espresso Cake
- Add the butter to a medium saucepan and place over medium heat.
- Occasionally stir to melt, then continue to stir as it goes from loud and bubbly to quiet and frothy.
- When it goes quiet, the browning process will happen pretty fast so don’t walk away from the pot. Keep stirring until the butter turns an amber color and gives off a nutty aroma.
- Remove from heat and pour the butter into a large mixing bowl. Make sure to scrape in all the brown bits at the bottom of the pot.
- Allow the butter to cool at room temperature and set the pot off to the side to cool as we’ll be using it for the frosting later.
- In the meantime, preheat the oven to 350F and grease a 10×15 jelly roll pan with non-stick spray.
- Once the butter has cooled, whisk in the sugar and brown sugar followed by the eggs and vanilla.
- Once smooth, whisk in the sour cream, baking soda, and salt.
- Off to the side – in a measuring glass, mix together the warm water and espresso.
- Now back to the mixing bowl – mix in half of the flour, then the warm espresso, then the rest of the flour.
- Pour the batter into the jelly roll pan and spread even. Bake for 25-30 minutes or until the center is soft and bouncy to the touch.
- Allow the cake to cool either at room temperature or in the refrigerator.
Toasted Milk Frosting
- While the cake cools, start on the frosting.
- Using the same pot we browned the butter in, wipe it clean and sprinkle in the dry milk powder.
- Place over medium-low heat and use a rubber spatula to stir occasionally at first. It won’t look like anything is happening for a few minutes, but slowly the powder will begin to clump as you stir.
- When you notice it’s starting to turn golden, constantly move it around to prevent any burning.
- As you stir, press into the clumps to help break them apart. Once the dry milk powder turns a graham cracker color, remove from heat and work on breaking down those clumps even further.
- Once you’ve reached a near-powder consistency, mix in the milk to form a paste.
- Scoop the paste into a small dish and chill in the refrigerator.
- By the time the cake has completely cooled, the toasted milk should also be cooled enough to continue making the frosting.
- In a large mixing bowl using a hand or stand mixer with the whisk attachment, mix together the toasted milk and room temperature butter.
- Then mix in the powdered sugar one cup at a time, followed by the vanilla.
- Spread the frosting over the cooled cake and top with chopped chocolate covered espresso beans.
- Now slice and enjoy!

- Prep Time: 30 minutes
- Cooling Time: 1 hour
- Cook Time: 30 minutes
- Category: Dessert
- Method: Baking
- Cuisine: American